WordPress Forms play a big part in reaching out to visitors and expanding your audience. Whether you want to add a contact form, a survey or a feedback form, embedding them into your website is a quick and easy way to gather information from your visitors.
![Image [1] - How to Embed Forms in WordPress for Beginners (Complete Guide) - photonwave.com | Professional WordPress Repair Service, Global Reach, Fast Response](https://www.361sale.com/wp-content/uploads/2024/10/2024102803200535.png)
What is a WordPress form? Why is it important?
WordPress forms are tools used to collect valuable information on a website. Visitors can enter their details. For example, their name, email address and feedback.
Forms have many uses. For example, a contact form can be created to allow users to contact the site's customer service and build an email list, a survey can be created to gather opinions, or an event registration form can be created.
Let's see how to embed the form!
How to Embed Forms in WordPress
In the following sections, we'll demonstrate each step of adding a form to your WordPress site:
1. How to embed WPForms into a WordPress website
WPFormsIt is the best multipurpose form generator in the market. It is also one of the most popular form generators with over 6 million active users.
This tool can be used to create any form you want with a choice of any of its more than 2,000 ready-made, customizable templates.
![Image [2] - How to Embed Forms in WordPress for Beginners (Complete Guide) - Photon Fluctuation Network | Professional WordPress Repair Service, Worldwide, Fast Response](https://www.361sale.com/wp-content/uploads/2024/10/2024102801575449.png)
apart fromContact formIn addition, WPForms can help you easily build forms from simple to more advanced, such as:
- survey
- Online Order Form
- terms of payment
- File Upload Form
- conversational format
- Multi-Page Forms
When embedding WPForms, you can use WPForms blocks or shortcodes.
Before you start, install and activate WPForms.
Then, you can follow our guide to understandHow to Create a Contact Form in WordPressThe
Embedding WPForms Forms with WPForms Blocks
Once the form is ready to publish, click inside the form builder on the "embedding" button to add the form to the page using the WPForms block.
![Image [3] - How to Embed Forms in WordPress for Beginners (Complete Guide) - Photon Fluctuation Network | Professional WordPress Repair Service, Worldwide, Fast Response](https://www.361sale.com/wp-content/uploads/2024/10/2024102802031126.png)
This opens a pop-up window where you can select an existing page or create a new page for the form.
- If you click on "Select an existing page" button, you will see a drop-down menu with all the available pages on the site.
- If you click on "Create new page", you will see a required "Name your page" field.
After selecting a page or naming a new page, you can click "Start!"Button.
![Image [4] - How to Embed Forms in WordPress for Beginners (Complete Guide) - Photon Fluctuation Network | Professional WordPress Repair Service, Worldwide, Fast Response](https://www.361sale.com/wp-content/uploads/2024/10/2024102802044786.png)
It will then be redirected to the block editor for that page.
From here, you can click the "+" button and search for WPForms blocks.
![Image [5] - How to Embed Forms in WordPress for Beginners (Complete Guide) - Photon Fluctuation Network | Professional WordPress Repair Service, Worldwide, Fast Response](https://www.361sale.com/wp-content/uploads/2024/10/2024102802052316.png)
The next step is to open the dropdown menu in the WPForms block and select the form to be embedded. Once the form is selected, WPForms will load it into the block editor.
If one wants to try the right panel of the "Form Settings".
By default, WPForms does not load form titles. To open the "Form title" option to add a form title and provide more background information for visitors. This option can also be turned on if writing a form description.
More conveniently, forms can be designed with themes that better match the overall look and feel of the site.
![Image [6] - How to Embed Forms in WordPress for Beginners (Complete Guide) - Photon Fluctuation Network | Professional WordPress Repair Service, Worldwide, Fast Response](https://www.361sale.com/wp-content/uploads/2024/10/2024102802082331.png)
If satisfied with the appearance of the form, continue and click "save (a file etc) (computing)". This is how to embed WPForms using the WPForms block.
![Image [7] - How to Embed Forms in WordPress for Beginners (Complete Guide) - photonwave.com | Professional WordPress Repair Service, Global Reach, Fast Response](https://www.361sale.com/wp-content/uploads/2024/10/2024102802090447.png)
Embedding WPForms Forms with Shortcodes
Another way to embed WPForms is to use theshort code. To travel toWPForms " All Formsto find each form's "short code"Column.
![Image [8] - How to Embed Forms in WordPress for Beginners (Complete Guide) - Photon Fluctuation Network | Professional WordPress Repair Service, Worldwide, Fast Response](https://www.361sale.com/wp-content/uploads/2024/10/2024102802094730.png)
From here, just copy the form shortcode that you want to embed. For example, we will copy the "Customer Reviews"Short code for the form.
Open the page or post where you want to embed the form. Go to"Page"or"card". Then, hover over one of the pages or posts and when it appears, click "compiler". It will be sent to the editor of the page or post.
To embed the form, click"+"button and search for"Shortcode" blockThe

After adding the block, you can paste the shortcode of the WPForms form into the text field.
The front end looks like this:
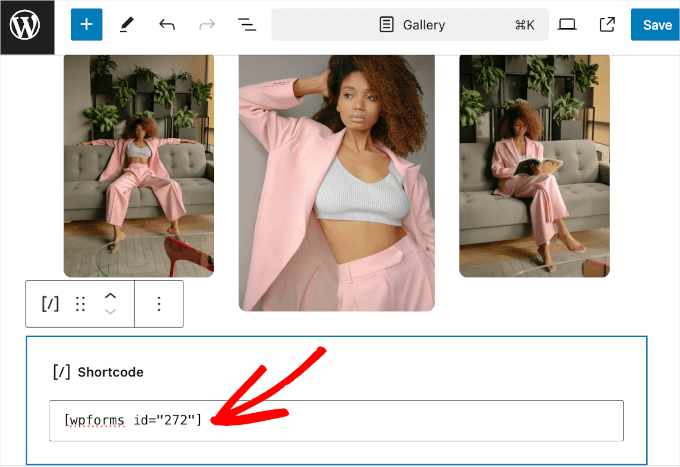
The block editor does not load forms in the live edit area.
So, to save the changes first, then in the lower left corner appears "View page" button when you click it.

2. How to Embed a Donation Form in WordPress
Visitors are more likely to donate when they see a simple and straightforward way to do so.
The easiest way to embed a donation form in WordPress is to use theCharitablePlugin. This popular tool allows you to create and customize multiple fundraising campaigns with over 100 ready-made templates.

To install Charitable first. after activating it, let's head over toCharitable " Settingsto activate the Pro license. Simply paste the license key and click "Authentication Key" will initiate the process.
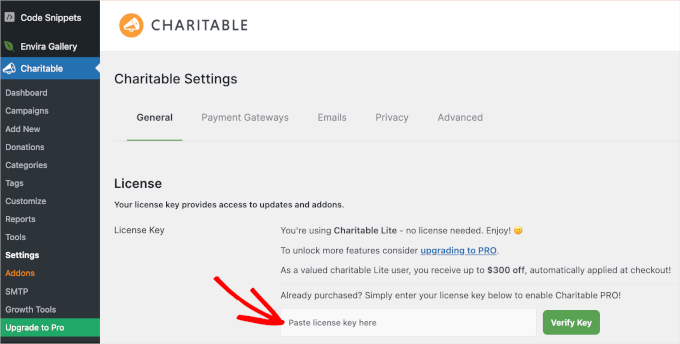
Once this is done, the donation form can be created.
Once you're happy with the look of the form, you can embed it into a WordPress post or page.
In the campaign builder, click "outline" drop-down menu to open its options. Then, go ahead and click the "post", Charitable automatically creates a new page for this action activity.

In this way, the first charity event was successfully created and published!
Now, refresh the front end of the site to see the donation form.

You may have also noticed the pop-up window "Embedding Wizard" link or the charity editor's "embedding"Button.
It is also possible to use any of these functions to add a donation form to itsHis post or pageThe
To do so, click "Embedding Wizard"link (on a website)Or."embedding" button, which triggers the embedding prompt.

In the pop-up window that appears, selectcurrent pagemaybeCreate new pageThe
Since we already have a dedicated donation form page, it's best to go with the"Select an existing page". Continue and click the button.
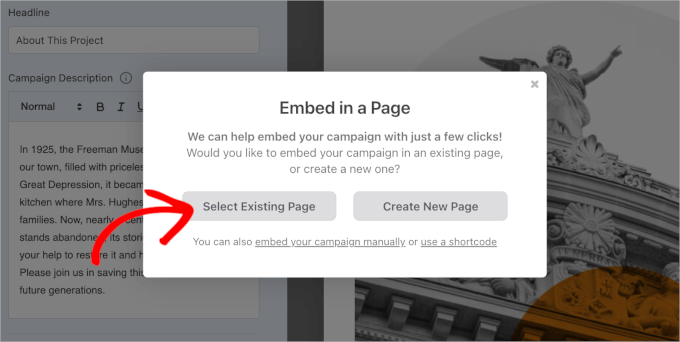
Then, you will see a drop-down menu that lists all the pages in your WordPress site.
You can expand the drop-down menu, select a page, and click "commencement"Button.
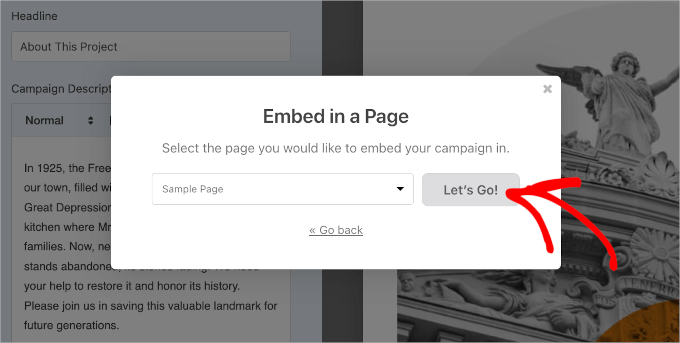
will redirect you to the block editor for that page.
From here, you can click on the"+" buttonand search"Charitable activities"Block. Then, simply click on the search result to add it to the content editor.
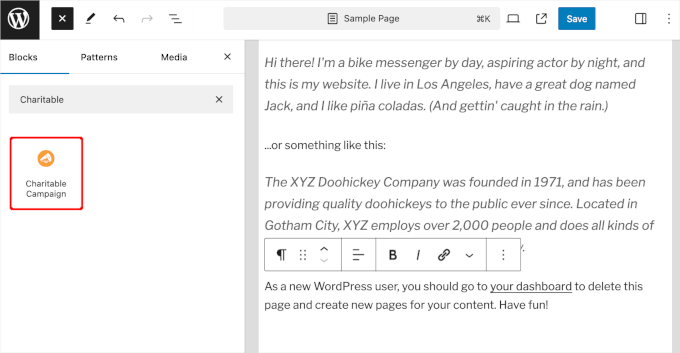
Then, it will be possible to get the information from the"Charitable activities"Block drop-down menu to select the donation form to be embedded.
Continue and expand the drop down menu. Then, simply click on the campaign you want to add.
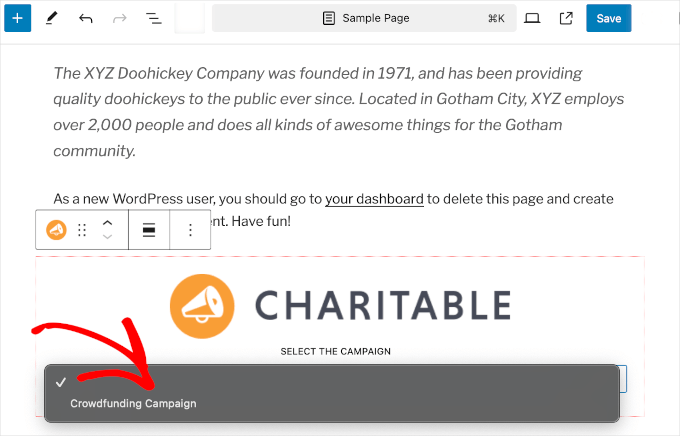
Don't worry if you can't see the preview in the content editor. The block is running fine.
Click "save (a file etc) (computing)","update"or"post" button to enable it is sufficient.
That's it! Now go to the front end and refresh that page to see the donation form in action:

3. How to embed Google Forms in WordPress
WPForms and other WordPress form builders are very easy to use. It can work directly on WordPress websites and can do a lot of things. For example: build forms to accept payments, create login forms, make custom user registration forms, and more.
At times, it may be necessary toSharing forms on different websites or platformsThe
Google Forms come in handy in these situations. They are easy to share, work well on cell phones, and keep all replies in one place. Additionally, collaborators can be added to help with replies, all stored in Google Drive.
To embed a Google Form in WordPress, you can first create a Google Form in the Google FormsCreate a form on the website . Click "Go to form "button will do.
![Image [22] - How to Embed Forms in WordPress for Beginners (Complete Guide) - photonwave.com | Professional WordPress Repair Service, Global Reach, Fast Response](https://www.361sale.com/wp-content/uploads/2024/10/2024102802410215.png)
On the next page, you will see various form templates. Just go ahead and click on one of them to start building.
It can also be accessed by clicking on the "blank form"From the top.
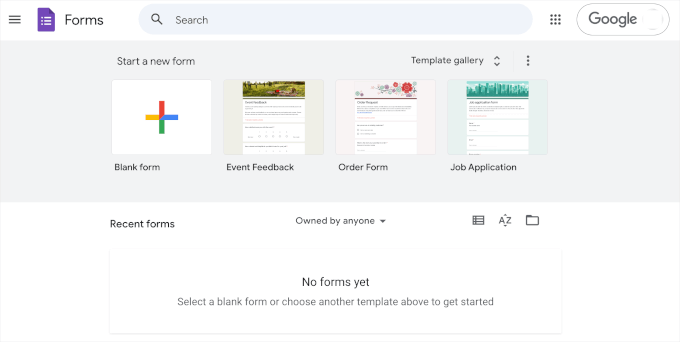
After selecting a template, you can start customizing the form. Here are a few actions that may need to be performed:
- Create a form title.
- Provides a description of the form.
- Customize the fields to match your goals.

AI tools can also be used to select the areas that are most appropriate for the site's problems.
If you are satisfied with the appearance of the form, continue and click "Send"button. This will open a popup window where you can get the embed code for the form.
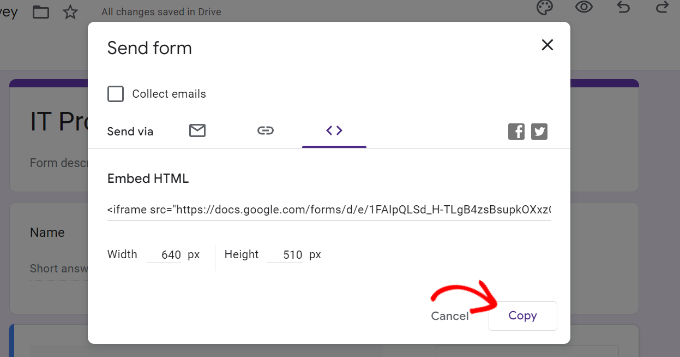
After copying this code, you can open the page or post in WordPress where you want to display the form.
existweb pagealternativelySub's content editorIn the "Programs" section, click on the "+" buttonand search for "Customizing HTML"Block. Add it to the page.
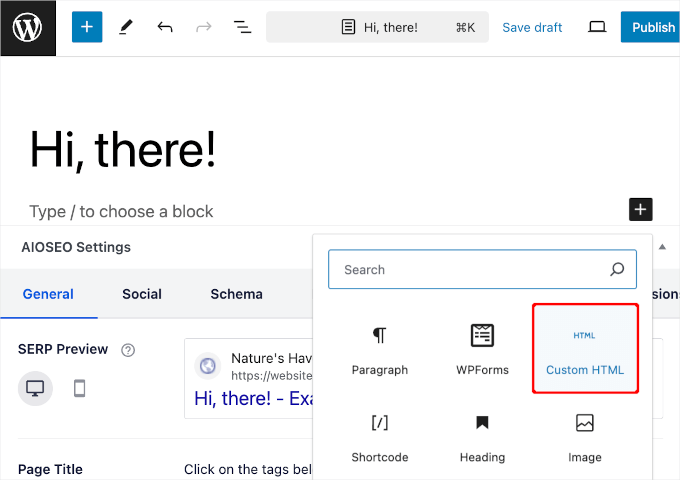
Then, simply paste the Google Forms embed code into the custom HTML block.
When you're done, remember to click "update"or"post" button. Now, go to the front end and refresh the site and you should see the Google form running.

4. How to Embed an Email Signup Form in WordPress
OptinMonsterWhile not a typical form builder, it is theCreating a user registration formrespond in singingBuilding Email ListsA great tool for the
Resource sites, in particular, have achieved excellent results using this lead generation tool. For example, the number of email subscribers has increased using OptinMonster.
There are various campaign types that can be used when setting up an email signup form. For example: slide-in and lightbox pop-up. So, before we discuss embedding the OptinMonster email signup form, let's make sure the form is ready to go.
First of all, you have to make sure that you have a good idea of what you want to do by clicking on the "Get OptinMonster now "button on their website to create aOptinMonster accountThe

It will go to the pricing page.
The Pro program is generally recommended because it includes "Withdrawal intentions"Function.
Start by installing and activating the OptinMonster WordPress plugin.
This plugin will connect a WordPress website to OptinMonster. simply navigate from the WordPress admin panel to the OptinMonster " Settings . Then, continue and click "Connect your existing account".

Once connected, the OptinMonster email registration form can be created.
OptinMonster's detailed display rules help increase conversions by allowing you to show the right campaign to the right person at the right time. They can be found in the campaign builder by going toDisplay rules to find these settings.

Here, it is possible to control when and where ads appear based on customer behavior.
Campaigns can also be customized for different users. For example, displaying different layouts for mobile and desktop users.

OptinMonster can set up rules based on specific dates or locations to run targeted campaigns for different countries/regions. For example, Black Friday deals or holiday-themed pop-ups.
Additionally, OptinMonster's Exit Intent technology helps to bring back visitors who are about to leave the site. This feature tracks user behavior and triggers targeted messages before they exit, which can attract more email subscribers and increase conversions.
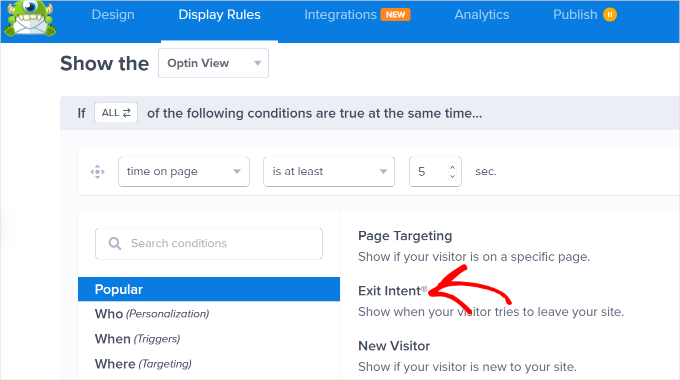
When satisfied with all the content, it's time to embed the lead generation form into the website.
Click the builder's "Save buttonThis will start the process.
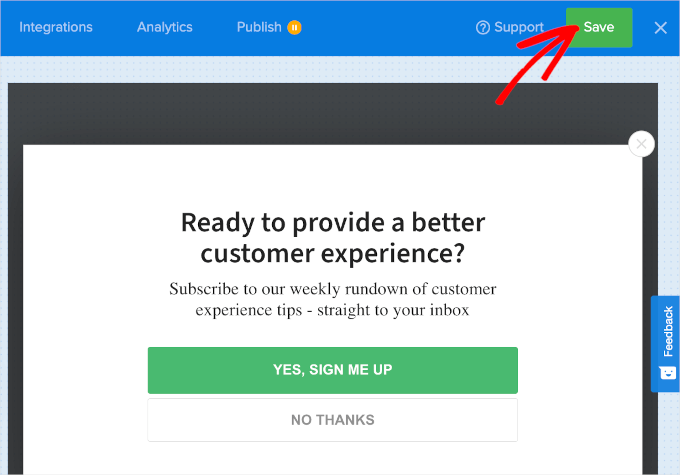
After you have saved your changes, you can switch to "post"Tab.
From here, status from "outline"was replaced by"Release". Then, one will see "post"The tab has been changed to "Published" and the pause icon has been changed to a check mark.
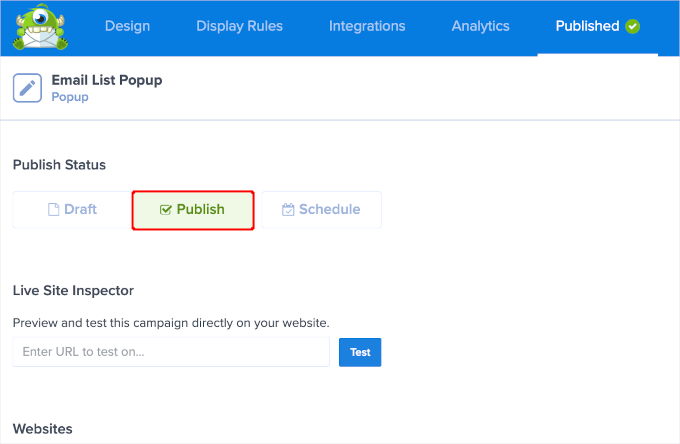
It is now possible to close the event editor and navigate to theOptinMonster " EventsThe
The next step is to change the status of the email signup popup from "pending"was changed to "post". Click "pending"The link opens a drop-down menu and selects "post" option is sufficient.
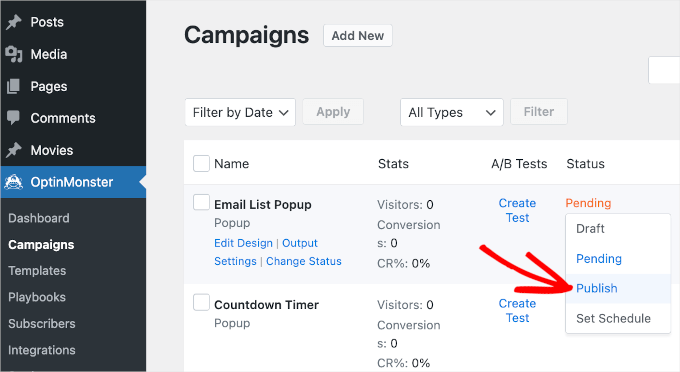
That's it!
Now, visit the front-end to refresh the site and you'll see the email signup popup.

I hope this article helps to understand how to embed forms in WordPress.
Link to this article:https://www.361sale.com/en/22322
The article is copyrighted and must be reproduced with attribution.









No comments