I don't know if you have ever encountered a WordPress websiteUnable to send emailI'm not sure if you're going to have any problems with the contact form submission disappearing, important notification emails not being delivered, and so on.
Actually, the problem is not WordPress. Rather, it's in the way the site sends out emails. Let's see what are the ways to go about fixing it.
![Image[1]-How to Fix WordPress Cannot Send Email Problem - Photon Flux | Professional WordPress Repair Service, Global Reach, Fast Response](https://www.361sale.com/wp-content/uploads/2024/09/2024092006492318.png)
Why are you not receiving emails from WordPress sites?
The most common reason for email loss is that the WordPress hosting server is not properly configured to use the PHP mail() function.
Even if the host is configured to use it, many email service providers (e.g., Gmail, etc.) use various tools to minimize spam. These tools try to detect if the email is coming from the place of origin of their specified website.
Emails sent from WordPress sites usually fail this test.
When sending an email from a WordPress website (from theContact formplugins, administrator notifications, etc.), it probably won't make it into the recipient's spam folder, let alone the inbox.
That's why we recommend that you use the SMTP Send EmailThe reason.
What is SMTP?
SMTP (Simple Mail Transfer Protocol) is the industry standard for sending e-mail.
Unlike the PHP mail() function, SMTP uses proper authentication and has a higher email delivery rate.
WordPress has aWP Mail SMTPPlugin that configures WordPress sites to use SMTP instead of the PHP mail() function to send emails.
It can be used to connect to any popular SMTP service such as SendLayer, Brevo (formerly known as Sendinblue), Gmail (Google Workspace), Amazon SES, and more.
Step 1: Install WP Mail SMTP Plugin
Whichever SMTP service you choose, you will need to install the WP Mail SMTP plugin on your website. This will switch WordPress from using the built-in PHP mail() function to using the SMTP service.
Install and activate the WP Mail SMTP plugin first.
Next, click "WP Mail SMTP" to configure the plugin settings.
![Image[2]-How to Fix WordPress Cannot Send Email Problem - Photon Flux | Professional WordPress Repair Service, Global Reach, Fast Response](https://www.361sale.com/wp-content/uploads/2024/09/2024092103210596.png)
First, enter the name and company email address of the website email sender.
Make sure that the e-mail address used here is the same as the one used for the SMTP mail service.
![Image[3]-How to fix WordPress not sending emails - Photon Flux | Professional WordPress repair service, worldwide, fast response!](https://www.361sale.com/wp-content/uploads/2024/09/2024092103220663.png)
Optionally, you can force emails to use this name and email address, even if other plugins (such as theWPFormsWP Mail SMTP overrides the settings of other plugins.
After that, choose an SMTP mail service for your website. In this tutorial, we are using SendLayer to set up SMTP.
![Image[4]-How to fix WordPress not sending emails - Photon Flux | Professional WordPress repair service, worldwide, fast response!](https://www.361sale.com/wp-content/uploads/2024/09/2024092103242320.png)
To complete the setup of WP Mail SMTP, create an account with SendLayer. We're going to do this next and then go back and finish setting up WP Mail SMTP, so keep this tab open.
Step 2: Setting up SMTP Mail Service
SendLayerA reliable email service provider. Capable of sending large volumes of emails with high delivery rates.
It is possible to send up to 200 emails for free with SendLayer, which is more than enough to get most small websites off the ground.
These could be emails from the contact form, new user account details, password recovery emails or any other emails sent through the WordPress website.
First, go.SendLayer websiteCreate an account. On the Pricing page, click "Try our free trial of SendLayer (send up to 200 emails)" link to set up an account.
![Image[5]-How to fix WordPress not sending emails - Photon Flux | Professional WordPress Repair Service, Global Reach, Fast Response](https://www.361sale.com/wp-content/uploads/2024/09/2024092103265786.png)
After creating your account, you will see your SendLayer dashboard.
Now that you have a SendLayer account, let's set up an email provider using WordPress.

Step 3: Connecting to a WordPress Website with SendLayer
Authorize the domain name before using SendLayer to send email.
This proves to the email server to be the confirmed owner of the sending domain and that your email was sent from a legitimate source.
To authorize your domain name, click the orange "Add Domain Name"Button.
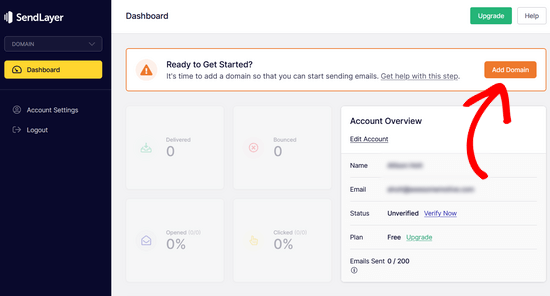
On the next page, enter the domain name in the field provided.
Then, click on "Add Domain Name"Button.

After adding a domain name, SendLayer displays the 5 DNS records in the DNS record settings that need to be added to the domain name.
These lines of code let SendLayer authorize your domain name.
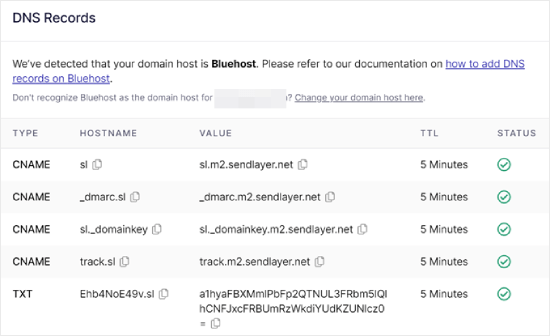
To add these DNS records to a WordPress website. This may seem complicated, but simply copy and paste them into the correct location.
Step 4: Finish setting up WP Mail SMTP to use SendLayer
Complete the setup. First, go to your SendLayer account to find the API key.
From the SendLayer dashboard, to the"Settings" " "API Key"page. Here, you will see the default API key that is generated when you authorize a domain in SendLayer.
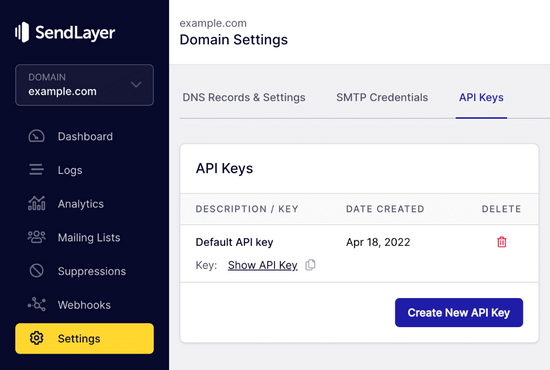
API keys can be copied from this page by clicking the Copy icon.
It's like this:
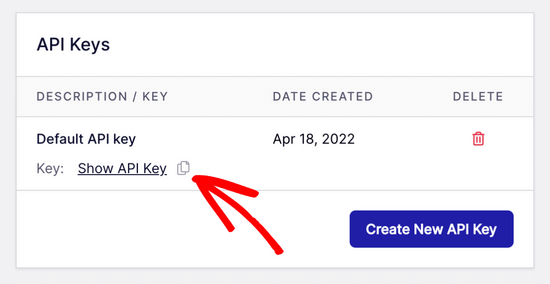
When finished, you can return to the WP Mail SMTP Setup Wizard tab.
Then, paste the API key into the appropriate location.
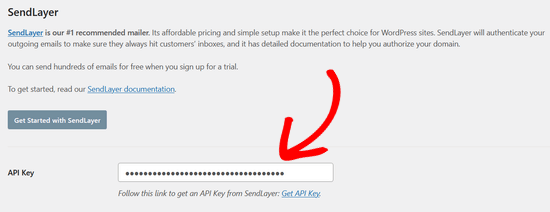
Everything is now set up. The final step is to send a test email to make sure everything is working.
switch toWP Mail SMTP " artifact. In "Email Testing" tab, enter the e-mail address to which you want to send the e-mail. The default is the site administrator's e-mail. Click the "mail".
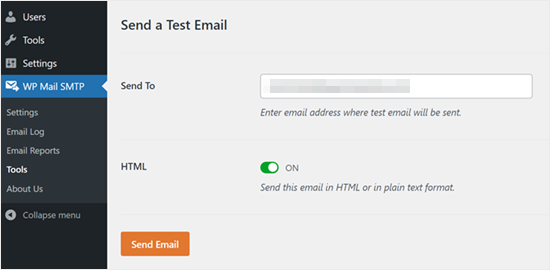
Should see the message."Test that the HTML email was sent successfully!"
Check your inbox to see if the email has arrived. The content of the email is as follows:
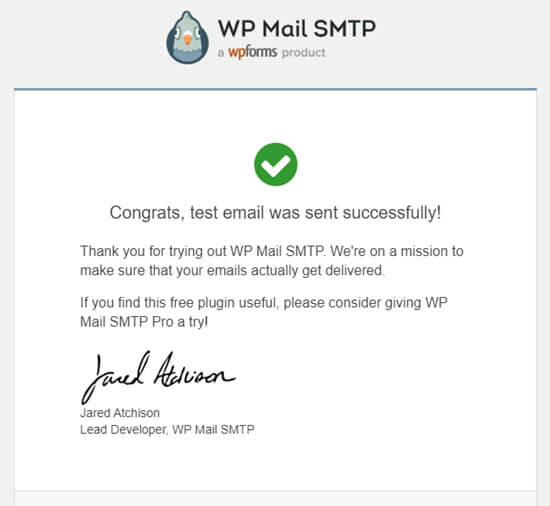
Attention:If the SendLayer account has not been activated, you will receive the following message:[permission_denied]: Unable to send email. Your SMTP account is not yet activatedThe
Alternative way to fix WordPress not sending email issue
As you can see from the list of email program options for the WP Mail SMTP plugin, it's not necessary to use SendLayer, and while it's our most recommended free plugin, there are other options that can be used, including Microsoft 365, Gmail (Google Workspace), Amazon SES, and more.
Fix WordPress Email with Gmail or Google Workspace with WP Mail SMTP
If you have Gmail, you can use it to send emails. No need to enter email login details in WordPress when using the WP Mail SMTP plugin.
To use Gmail or Google Workspace, set up WP Mail SMTP as shown above, then click the mail program's "Google/Gmail"Options.
Next, you can use WP Mail SMTP's One-Click Settings to configure mail program settings.
This method doesn't require creating your own app and is very simple. Just log in to your Gmail account and click "Save Settings"Just do it.
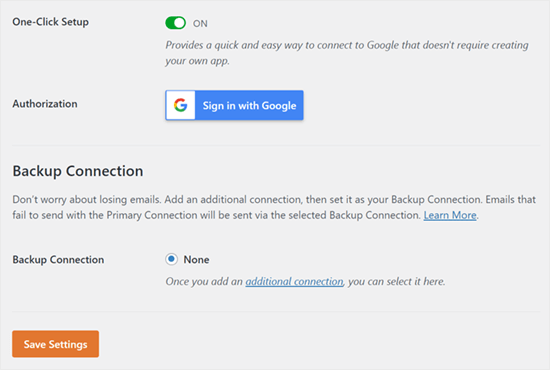
However, there are some major drawbacks to using professional Gmail or Google Workspace.
One is that you need to contact the web host to get them to install the correct certificates for it to work.
Another problem is that if you change your e-mail address in the future, you will need to go through the whole process again. This includes creating a new web application.
Fix WordPress Email with Microsoft 365 and WP Mail SMTP
If using Microsoft Office 365 or Outlook as your regular email account, then you can also use it to send emails through WordPress. It's not recommended though, as it's not very secure.
Set up WP Mail SMTP as described above, and then when selecting the SMTP mail program click "365 / Outlook" option. Then, to register an application on Microsoft Azure, conveniently fill in the following fields.
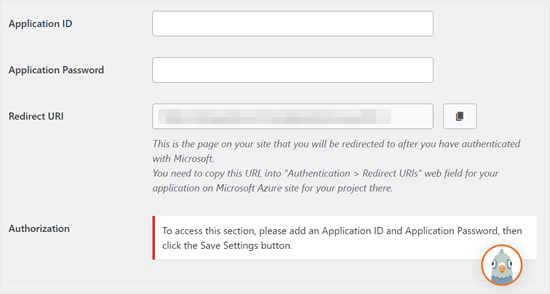
Fixing WordPress Emails with Amazon SES and WP Mail SMTP
The Amazon AWS platform has a Simple Email Service (SES) that can be used to fix WordPress email issues.
The best thing about Amazon is that it can send up to 62,000 emails per month for free. The downside is that the setup is a bit difficult for newbies, which is why we don't recommend it.
Regardless of which email program you use, remember to use "Test Email" feature to ensure that the email has been successfully sent. It is also important to ensure that you check your inbox and confirm that you have received the test e-mail.
Link to this article:https://www.361sale.com/en/20325
The article is copyrighted and must be reproduced with attribution.




No comments