Many webmasters want to know how to safely migrate their website to a new server. This tutorial has compiled a step-by-step guide for newbies, so some plugins will be used. Let's take a look together!
Step 1: Choose a New WordPress Server
If even after optimizing WordPress for speed and performanceAfter that, but if it is still running on a slow server. Then this is the time to either upgrade the server configuration or migrate the website to a new server. We are mainly talking about migration today, so migrate your WordPress website to a new server that can handle the growing traffic.
When looking for a new WordPress server provider, it is important to choose carefully so that you do not have to relocate again in the near future.
Please do not install WordPress after purchasing a new server. we will install it in a subsequent step.
For now, your new server should be empty, with no files or folders in the home directory.
Step 2: Set up the replicator for easy migration
The first thing to do is to install and activate the Duplicator plugin on the site you want to move.
Duplicator is one of the better WordPress migration plugins on the market. It also features automatic scheduled backups, cloud storage support, one-click recovery and smart migration.
Attention: Duplicator also has a free version called Duplicator Lite. it can be used for mobile websites, but has limited functionality compared to the pro version.
After installing and activating Duplicator, go to the WordPress admin area and go to theDuplicator " package page.
Next, click on the top right corner of the "newly built"Button.
![图片[2]-如何在不停机的情况下将 WordPress 迁移到新服务器-光子波动网 | 专业WordPress修复服务,全球范围,快速响应](https://www.361sale.com/wp-content/uploads/2024/09/2024091906491630.png)
will start the backup wizard for the replicator.
On the next screen, you can choose to provide a name for the backup, or simply click "the next step"The button continues.
![图片[3]-如何在不停机的情况下将 WordPress 迁移到新服务器-光子波动网 | 专业WordPress修复服务,全球范围,快速响应](https://www.361sale.com/wp-content/uploads/2024/09/2024091906500265.png)
Next, Duplicator scans the system to make sure everything is in order and the package can be prepared.
Make sure the scan is correct (everything should show "favorable"), and then click "construct (sth abstract)"Button.
![图片[4]-如何在不停机的情况下将 WordPress 迁移到新服务器-光子波动网 | 专业WordPress修复服务,全球范围,快速响应](https://www.361sale.com/wp-content/uploads/2024/09/2024091906504650.png)
This process can take several minutes to complete, so keep the tab open while the plugin performs its work.
Once the process is complete, you will see the download options for the installer and archive package. Click "downloading" button, and then select the "Two documents".
![图片[5]-如何在不停机的情况下将 WordPress 迁移到新服务器-光子波动网 | 专业WordPress修复服务,全球范围,快速响应](https://www.361sale.com/wp-content/uploads/2024/09/2024091906512683.png)
The archive file is a backup of the complete website and the installer file will automate the installation process.
Step 3: Import WordPress Website to New Server
Now that the archive and installer files have been downloaded, the next step is to upload them to the new server.
This can be done by connecting to the new server using FTP or the control panel.
Normally, when connecting to an FTP client, the domain name of a website is entered as the host.
However, since the domain name still points to the old server, you need to connect to it by entering the IP address of the server or the server hostname. Once connected, the archive zip file and installer.php file will be uploaded to the root directory of the website.
Step 4: Change the Hosts File to Prevent Downtime
After uploading both files to the new host, you need to access the installer.php file in your browser.
Typically, this file can be accessed using the following URL:
http://www.361sale.com/installer.php
However, the URL will take you to the old server and you will receive the404 ErrorThis is because the domain name is still pointing to the old server. This is because the domain still points to the old server.
We'll show you how to temporarily access your new website on your computer without affecting the old one.
This is done through the hosts file on your computer.
The hosts file can be used to map a domain name to a specific IP address. In other words, it allows a computer to mistakenly think that a website has moved, when it hasn't.
Let's see how to add a domain name entry to the hosts file so that it points to the new server.
After making these changes, files on the new host can be accessed using your own domain name, while the rest of the world will still access the site from the old server. This ensures that100% UptimeThe
The first thing to do is to find the IP address of the new server. Log in to the panel where you purchased the server to see it.
If you are using a Windows PC, you need to open the Notepad application with administrator privileges.
Click "commencement" button and then look for the Notepad application. Right-click the Notepad application icon and select the "Run as administrator".
![图片[6]-如何在不停机的情况下将 WordPress 迁移到新服务器-光子波动网 | 专业WordPress修复服务,全球范围,快速响应](https://www.361sale.com/wp-content/uploads/2024/09/2024091907045282.png)
A Windows UAC prompt will appear and you will need to click Yes to start Notepad with administrator privileges.
On the Notepad screen, go toFile "Openand then navigate toC:WindowsSystem32driversetcfolder. From this folder, select the hosts file and open it.
If you are using a Mac, you will need to open the Terminal application and enter this command to edit the hosts file:
sudo nano /private/etc/hosts
For Windows and Mac users, at the bottom of the hosts file, you'll want to enter the copied IP address and then your domain name. This is shown below:
192.168.1.22 www.361sale.com
Make sure to replace the IP address with the IP address you copied earlier and replace www.361sale.com with your own domain name.
When finished, save the changes.
The files on the new server can now be accessed on your computer using the domain name.
Important Tip:After completing the migration, do not forget to undo the changes made to the hosts file (step 6).
Step 5: Create a MySQL Database on the New Host
Before we can run the installer on the new host, we need to create a MySQL database on the new server. If a MySQL database has already been created, then skip to the next step.
Creating a database
Go to the control panel of the new server, scroll down to the Database section, and click "MySQL Database".
will see a field for creating a new database.
Enter the name of the database and click "Creating a database"Button.
![图片[7]-如何在不停机的情况下将 WordPress 迁移到新服务器-光子波动网 | 专业WordPress修复服务,全球范围,快速响应](https://www.361sale.com/wp-content/uploads/2024/09/2024091907123514.png)
After creating the MySQL database, scroll down to the MySQL Users section.
Next, give the new user a username and password and click "Create User"Button.
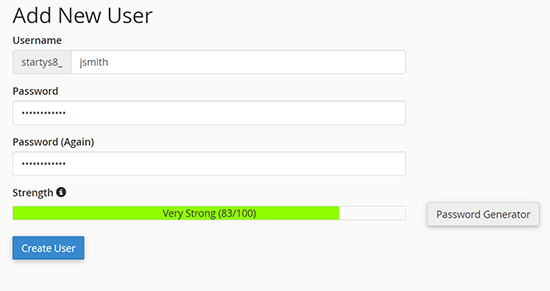
After that, add this user to the database. It gives the user name just created all the permissions to work on that database.
This can be done by scrolling down to "Adding users to the database"section to perform this action. Simply select the created database user from the drop-down menu next to Users, then select the database and click the "Add "Button.
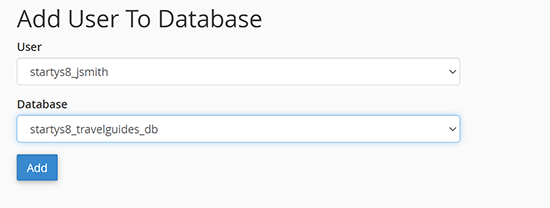
The database now works with WordPress. Be sure to write down the database name, username and password. This information will be needed in the next step.
Step 6: Start the Replicator Migration Process
Now, get ready to run the installer. Navigate to the following address in your browser window and replace 361sale.com with your own domain name:
https://www.361sale.com/nstaller.php
![图片[10]-如何在不停机的情况下将 WordPress 迁移到新服务器-光子波动网 | 专业WordPress修复服务,全球范围,快速响应](https://www.361sale.com/wp-content/uploads/2024/09/2024091907155629.png)
The installer will run some tests and display next to the archive and verification tests "pass (a bill or inspection etc)".
To check the Terms and Conditions checkbox, then click "the next step"The button continues.
The system will now ask for the MySQL Host, Database Name, Username and PasswordThe
After that, enter the details of the database created in the previous step.
![图片[11]-如何在不停机的情况下将 WordPress 迁移到新服务器-光子波动网 | 专业WordPress修复服务,全球范围,快速响应](https://www.361sale.com/wp-content/uploads/2024/09/2024091907164131.png)
Next, the replicator needs to check that it can connect to the database and can run the installation.
Click on the bottom "validate (a theory)"The button continues.
![图片[12]-如何在不停机的情况下将 WordPress 迁移到新服务器-光子波动网 | 专业WordPress修复服务,全球范围,快速响应](https://www.361sale.com/wp-content/uploads/2024/09/2024091907170560.png)
If the replicator is able to connect, then you will see the test result as pass.
You can now check the Terms and Notices checkbox and click "the next step"Button.
![图片[13]-如何在不停机的情况下将 WordPress 迁移到新服务器-光子波动网 | 专业WordPress修复服务,全球范围,快速响应](https://www.361sale.com/wp-content/uploads/2024/09/2024091907182081.png)
Click "the next step"The button continues.
Duplicator will now import the WordPress database from the archive zip into the new database.
Next, it will ask to update the site URL or path. Since there is no domain name change, there is no need to change anything here.
Simply click "the next step" button to continue.
Duplicator will run the final steps and display the login button.
![图片[14]-如何在不停机的情况下将 WordPress 迁移到新服务器-光子波动网 | 专业WordPress修复服务,全球范围,快速响应](https://www.361sale.com/wp-content/uploads/2024/09/2024091907201471.png)
You can now log in to your WordPress site on the new server to make sure everything is working.
Link to this article:https://www.361sale.com/en/20114
The article is copyrighted and must be reproduced with attribution.





No comments