![Image[1] - WooCommerce Subscription Reminder Email Guide: Boost Customer Satisfaction and Repeat Purchases - Photon Fluctuation Network | Professional WordPress Repair Service, Worldwide, Fast Response](https://www.361sale.com/wp-content/uploads/2024/08/2024080503293247.png)
The importance of subscribing to reminder emails
After setting up a WooCommerce subscription, it's a good idea to create subscription reminder emails. Theseautomated messageReminding your customers when a subscription is coming up for renewal helps you and your customers in several ways:
- Reduced management hassles: Remind customers to update their payment details and contact information to minimize administrative headaches caused by failed payments.
- Avoid refund requests and customer complaints: Give customers the opportunity to cancel their subscription before renewal, avoiding refund requests and customer complaints due to accidental renewals.
- Improve customer satisfaction: Timely reminders make customers feel valued and cared for, increasing customer satisfaction and loyalty.
How to Customize WooCommerce Emails with FunnelKit Automations?
Before proceeding to the main process, make sure to install theFunnelKit Funnel Builderrespond in singingFunnelKitThe
For a more effective and personalized WooCommerce email, both the Free and Pro versions are required, as we will be using some of the professional features.
![Image [2] - WooCommerce Subscription Reminder Email Guide: Boost Customer Satisfaction and Repeat Purchases - Photon Fluctuation Network | Professional WordPress Repair Service, Worldwide, Fast Response](https://www.361sale.com/wp-content/uploads/2024/08/2024080503163337.png)
After installing the plugin, follow the steps below:
Step 1: Disable Default WooCommerce Emails
First, you need to disable the "Completed Orders" email.
To do so, please go toWooCommerce ⇒ Settings ⇒ Emailtab, and then click "Completed Orders"Management Options.
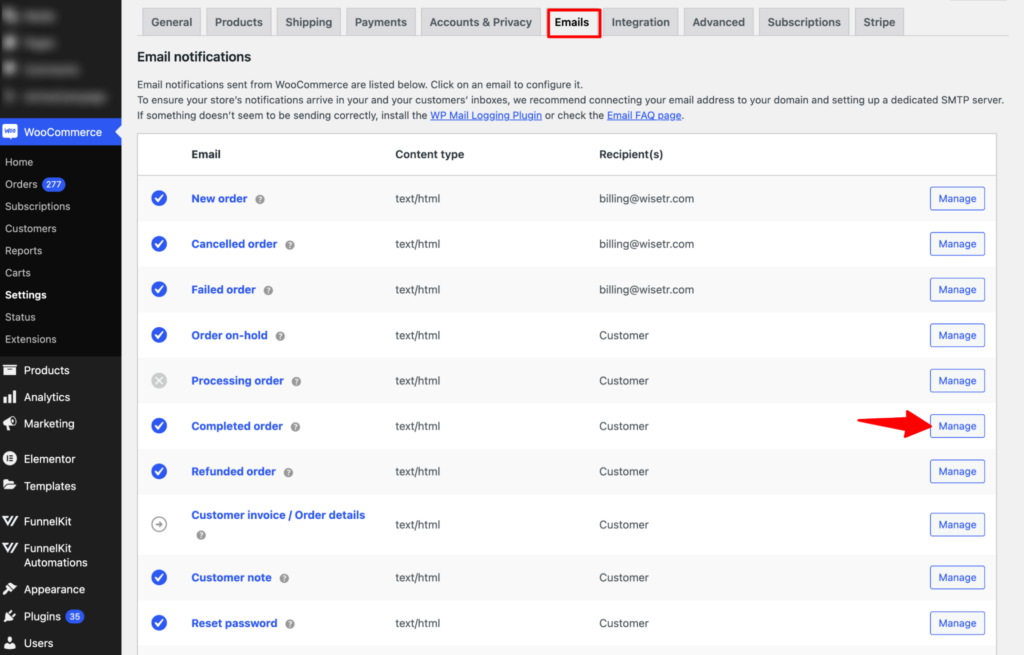
present .Uncheck "Enable this e-mail notification".options, and then click Save Changes.

This will prevent WooCommerce from sending the default email.
A customized email will now be created in theOrders are automatically sent to customers when shippedThe
Step 2: Add new automation
The first step is to create a new automation.
Navigate toFunnelKit Automations ⇒ Automations (NextGen)And thenClick Create Automation.
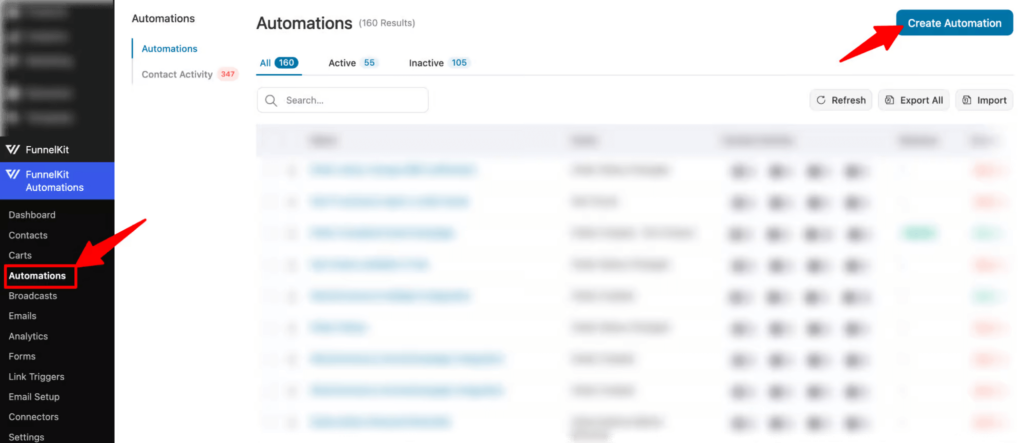
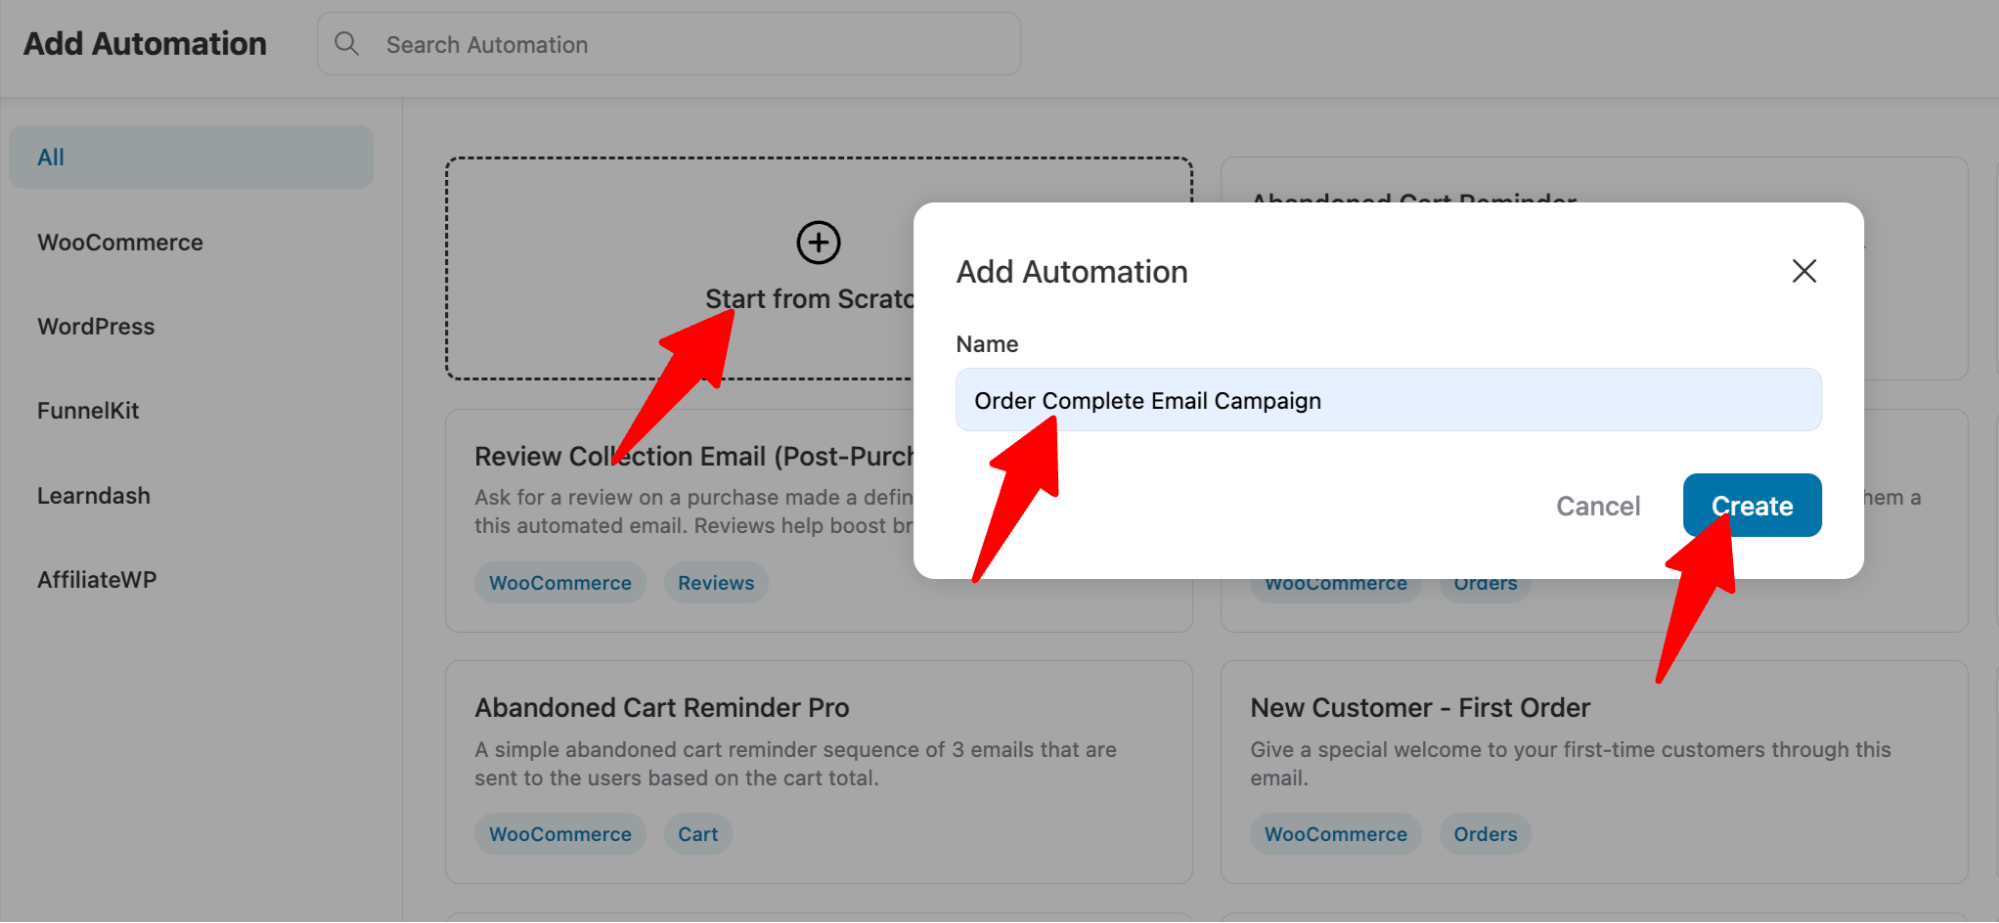
Many pre-built templates can be found here. But let's build the email campaign from scratch. First, click "scratch"Options.
After that, provide a name andClick "Create".
Step 3: Select Trigger
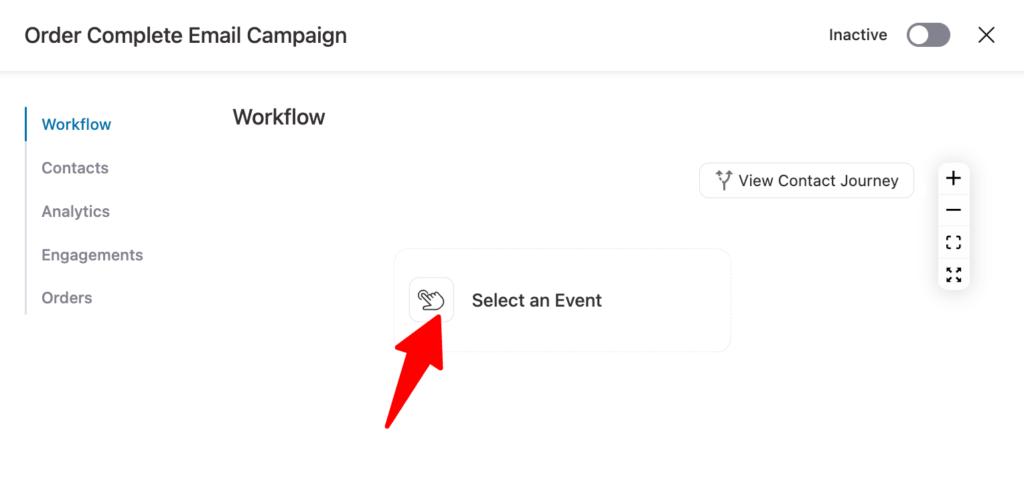
The next step is to select the trigger. Triggers are events that initiate automation and send emails to customers.
To select a trigger, click"Select Trigger".
Go to the WooCommerce tab, and then under OrdersSelect "Order Status Changed".Finally, click "Finish".

Now you need to configure the status change that will trigger this email campaign. Please click on the event you just selected "Order Status Changed". Select the "Starting Status" as "In Process" and the "Ending Status" as "Completed". Finally, click Save.
This email campaign runs once the order status has been updated from Processing to Completed After Shipment.

Step 4: Create a Dynamic Coupon (optional)
Since we plan to offer a discount coupon on your next purchase, add an action that will be available once weThe set event is triggeredThen the coupon will be generated automatically.
To do this, click"+" iconfurthermoreSelect the "Operation" step.
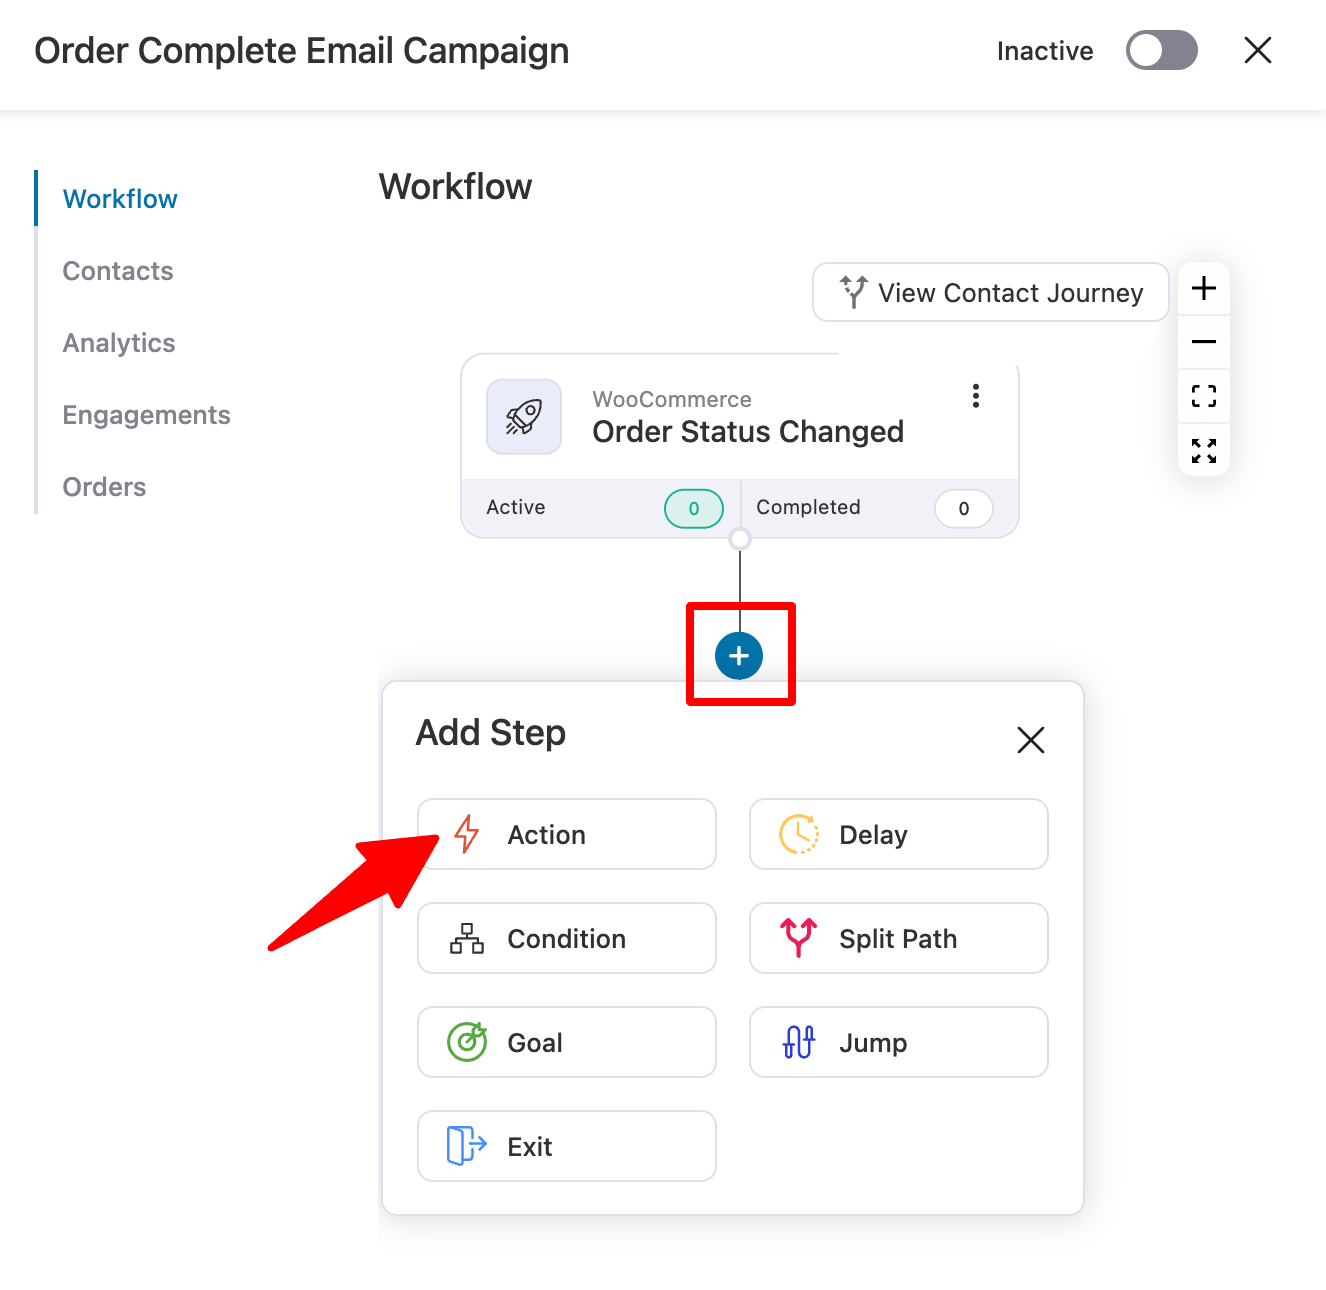
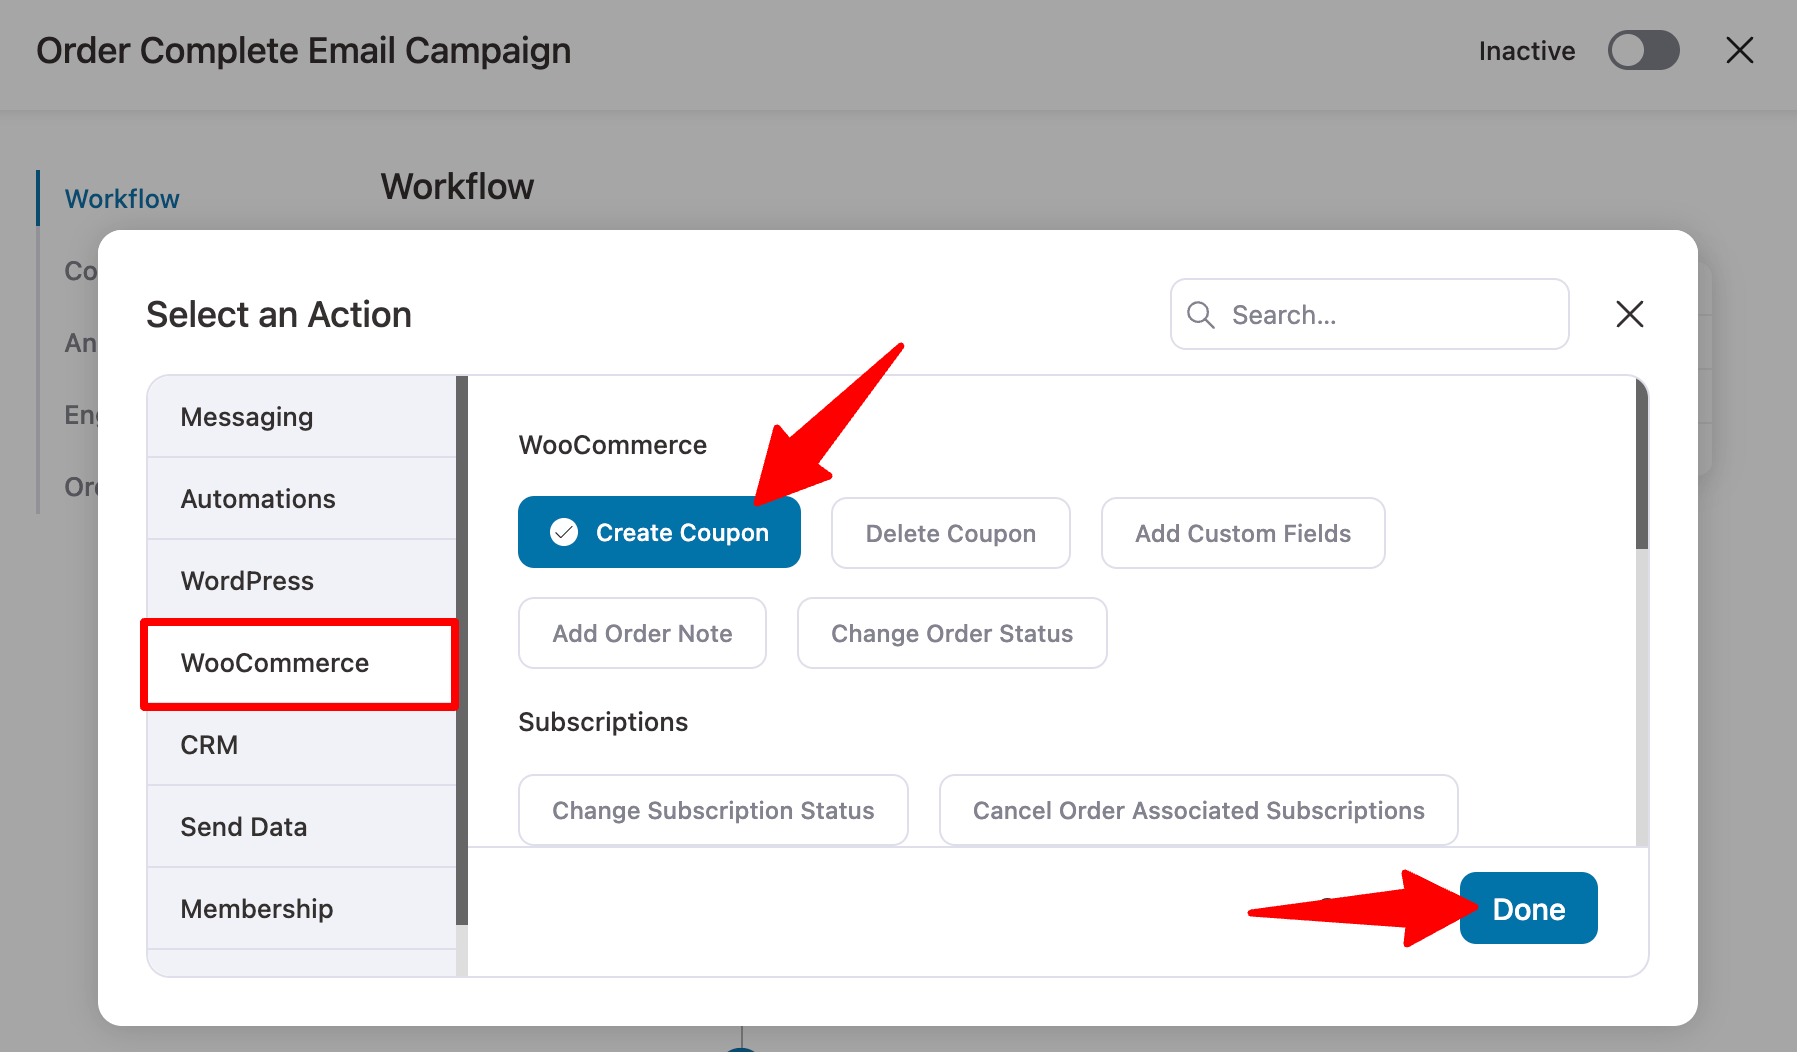
On the WooCommerce tab, select "Creating Coupons" and click Finish.
Now provide all the coupon details such as coupon title, discount type, coupon code prefix, coupon expiration date, etc. to create dynamic coupons.
In this case, it will be usedMerge Tags"{{contact_first_name}}" as coupon code prefix to personalize the generated coupon code by adding the name at the beginning of the discount code. Finally, click Save Changes.
Create a coupon valid for 3 days for a 10% discount.
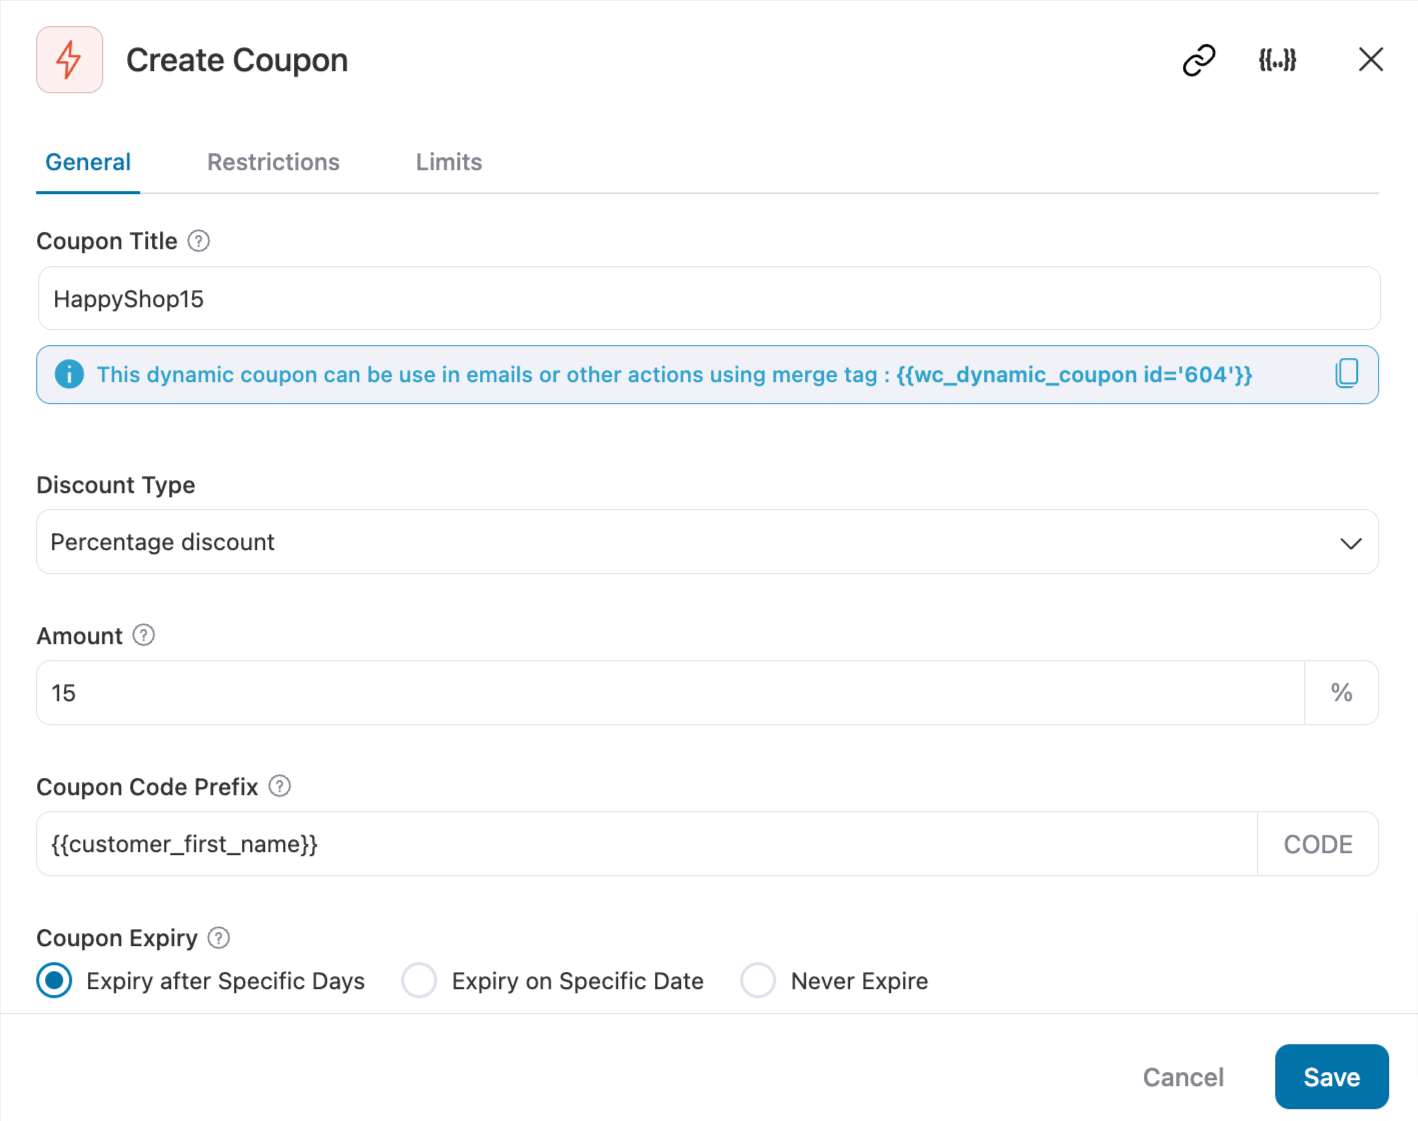
This creates a dynamic coupon that can be embedded in the body of an email.
Step 5: Setting Up the Send Email Action
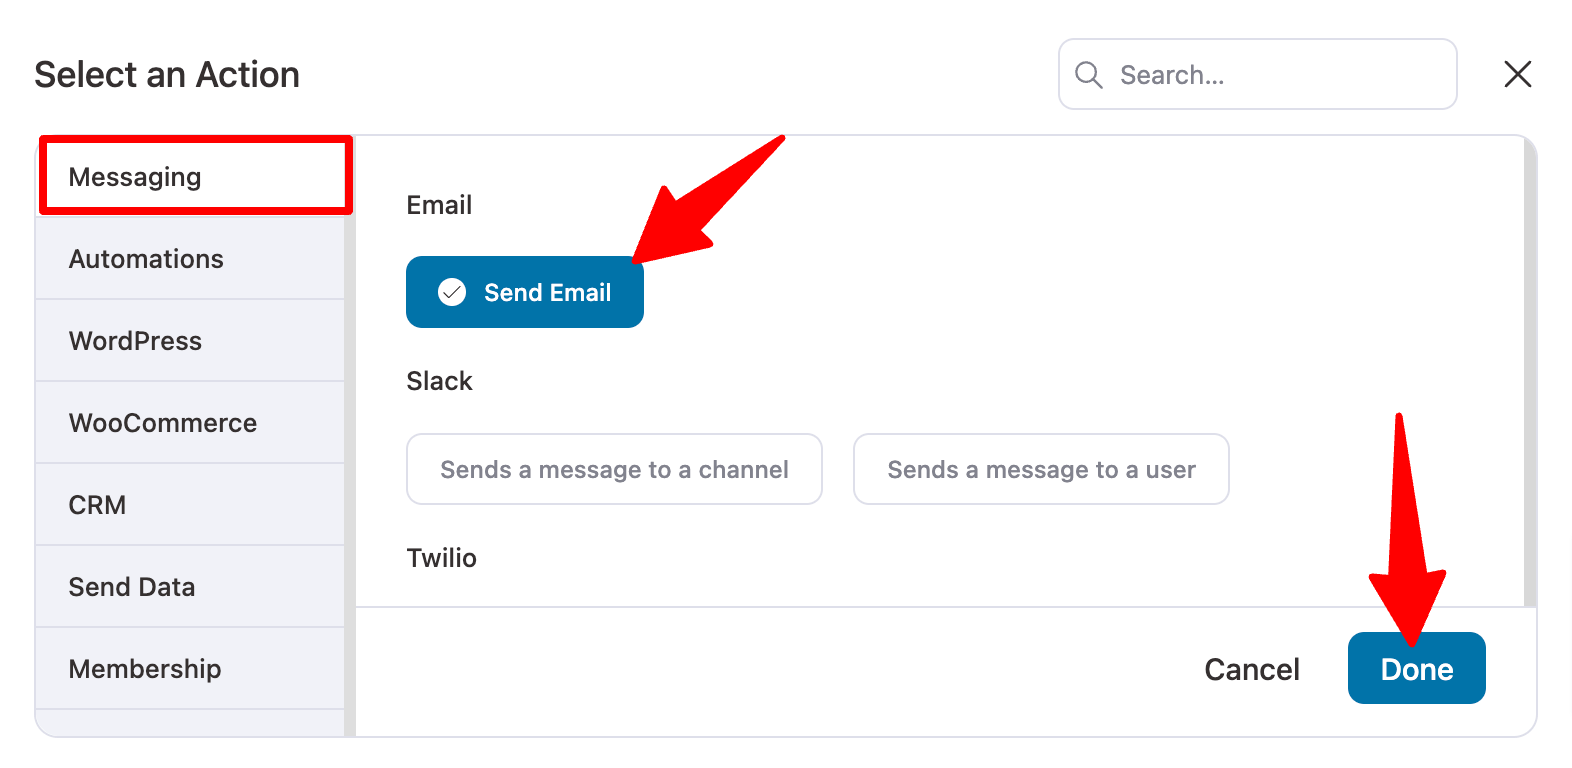
To set up the Send Email action, click Create Coupon Action after the"+" icon.

Now in "messages" tab, under E-Mail.Select "Send e-mail"and then click on "fulfillment".
Step 6: Customize Email
Now it's time to customize and design order completion emails.
Start with a subject line
To make subject lines and entire emails more personalized and compelling, use Funnelkit's merge tags feature to integrate dynamic information, such as customer emails.
How to add merge tags
- Click on the "{{...}}" icon.
- Search for the tag you want to use.
- Click the copy icon to add it to your email.
Personalized subject lines and preview text
We recommend combining the customer's name and order ID to make the subject line and preview text more attractive. Example:
Preview text: Your order has been completed, {{customer name}}, please see details.
Subject line: thank you for your purchase, {{customer name}}! Order ID: {{order ID}}
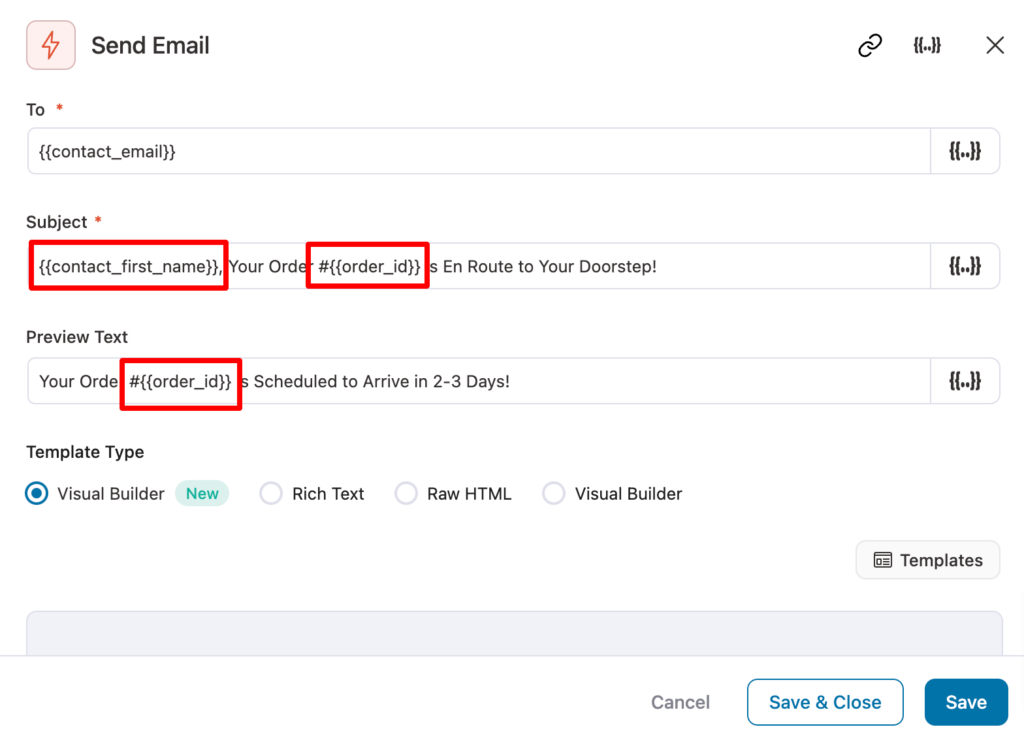
Emails can be designed using Visual Builder (new), Rich Text, Raw HTML and Visual Builder.
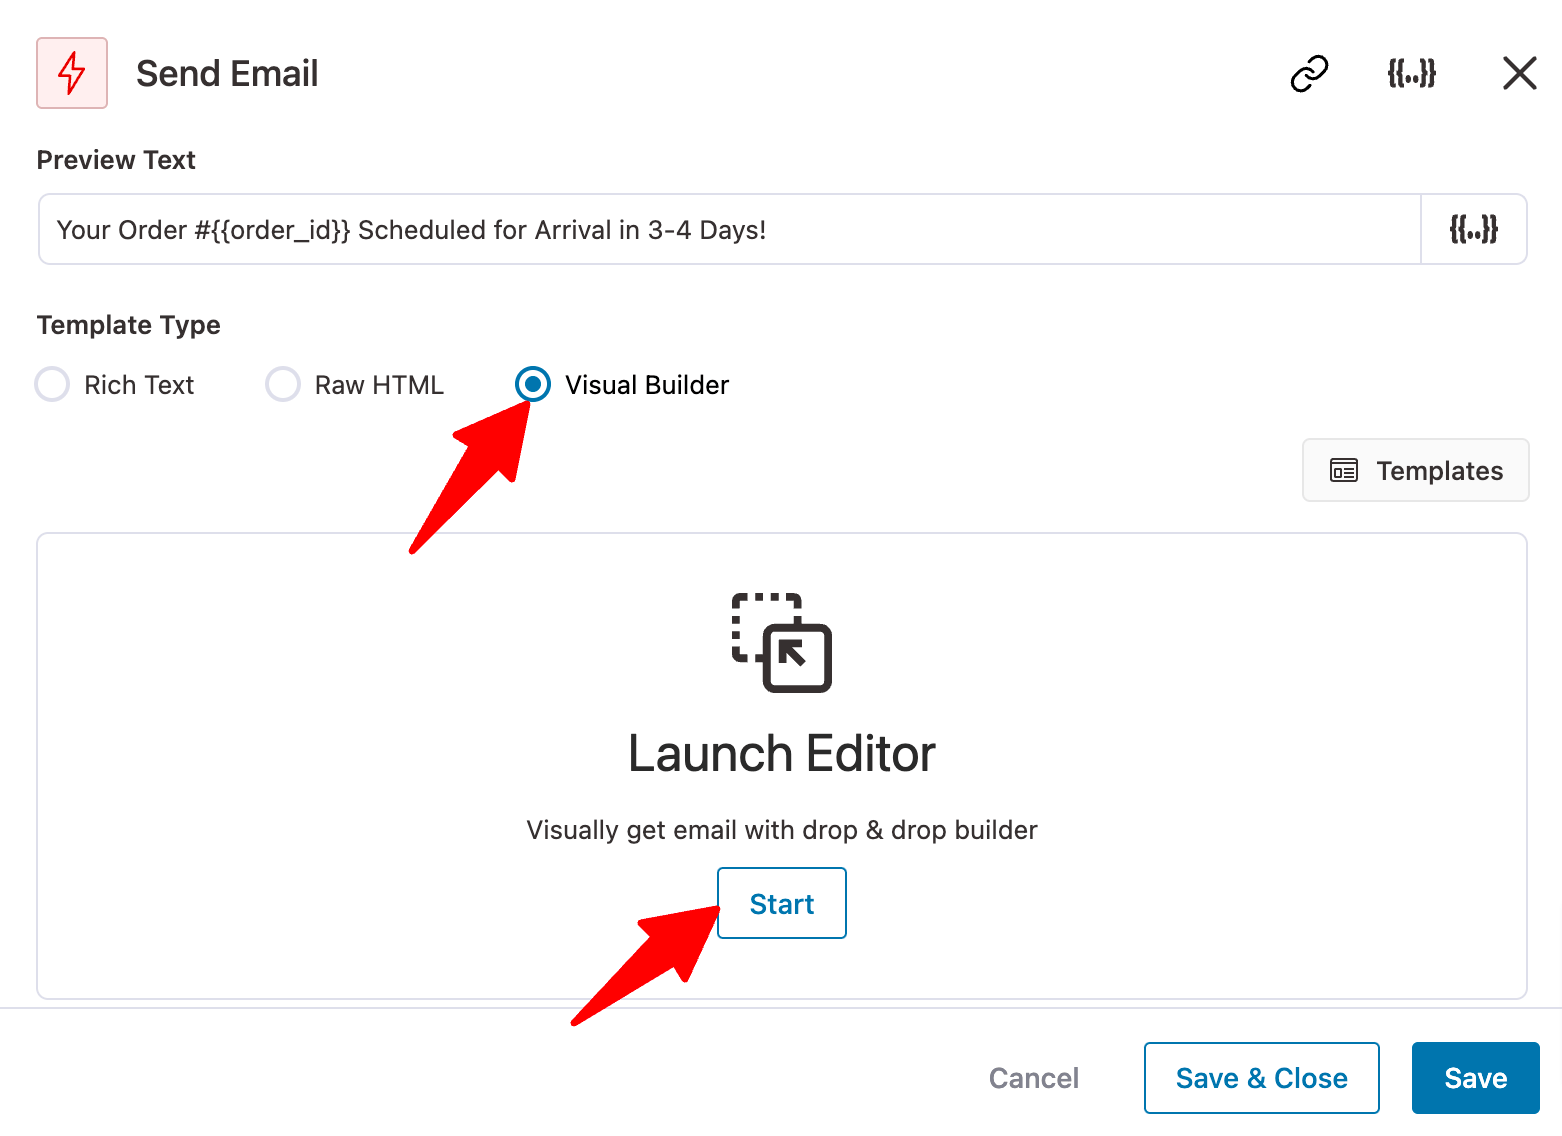
We are using Visual Builder (new) for this blog, so select "Visual Builder (new)" and click "compiler".
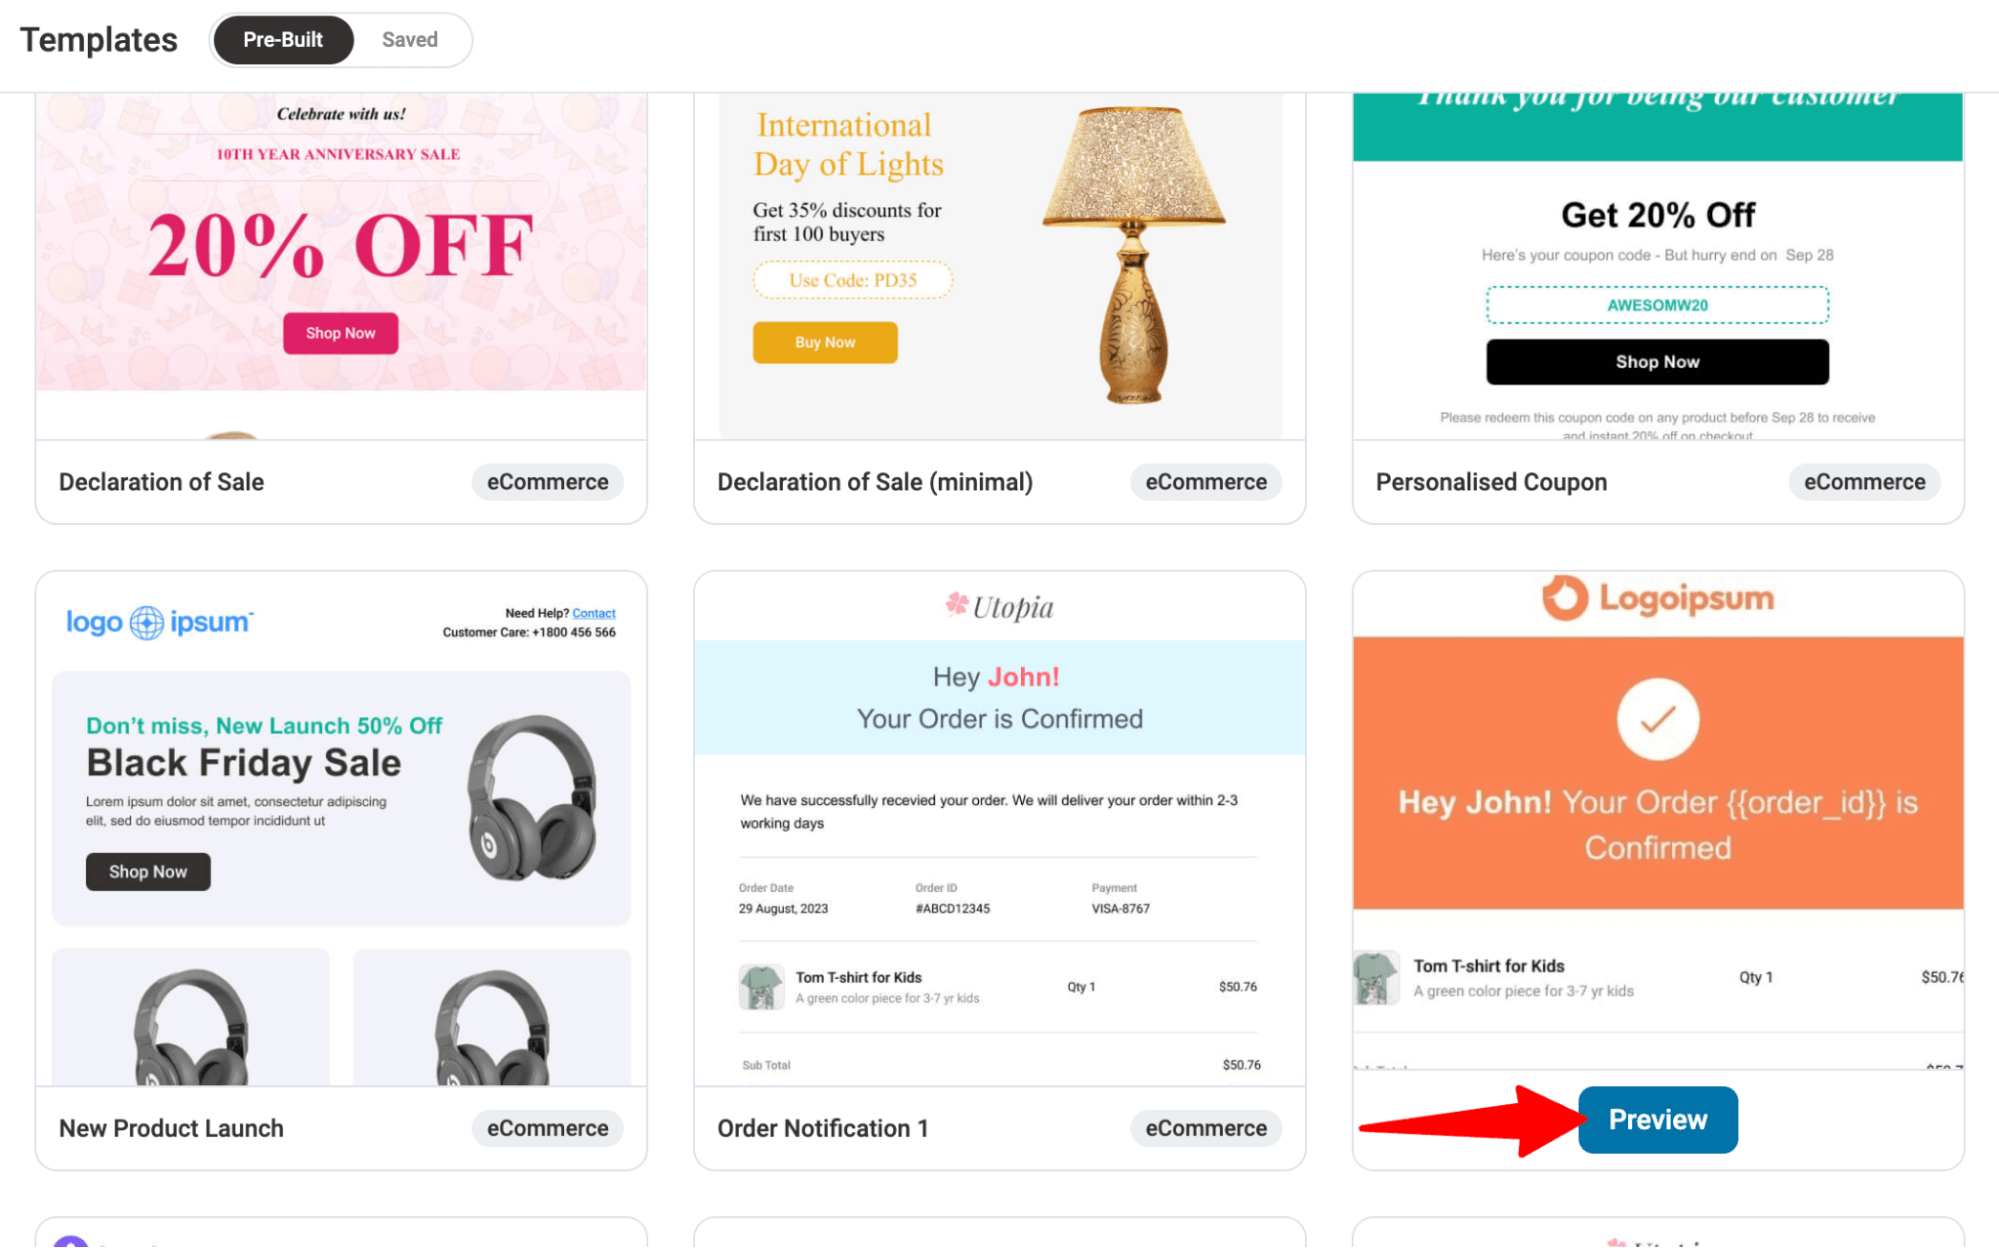
Now, we'll use one of the pre-built templates, FunnelKit Automations, to design our order fulfillment emails.
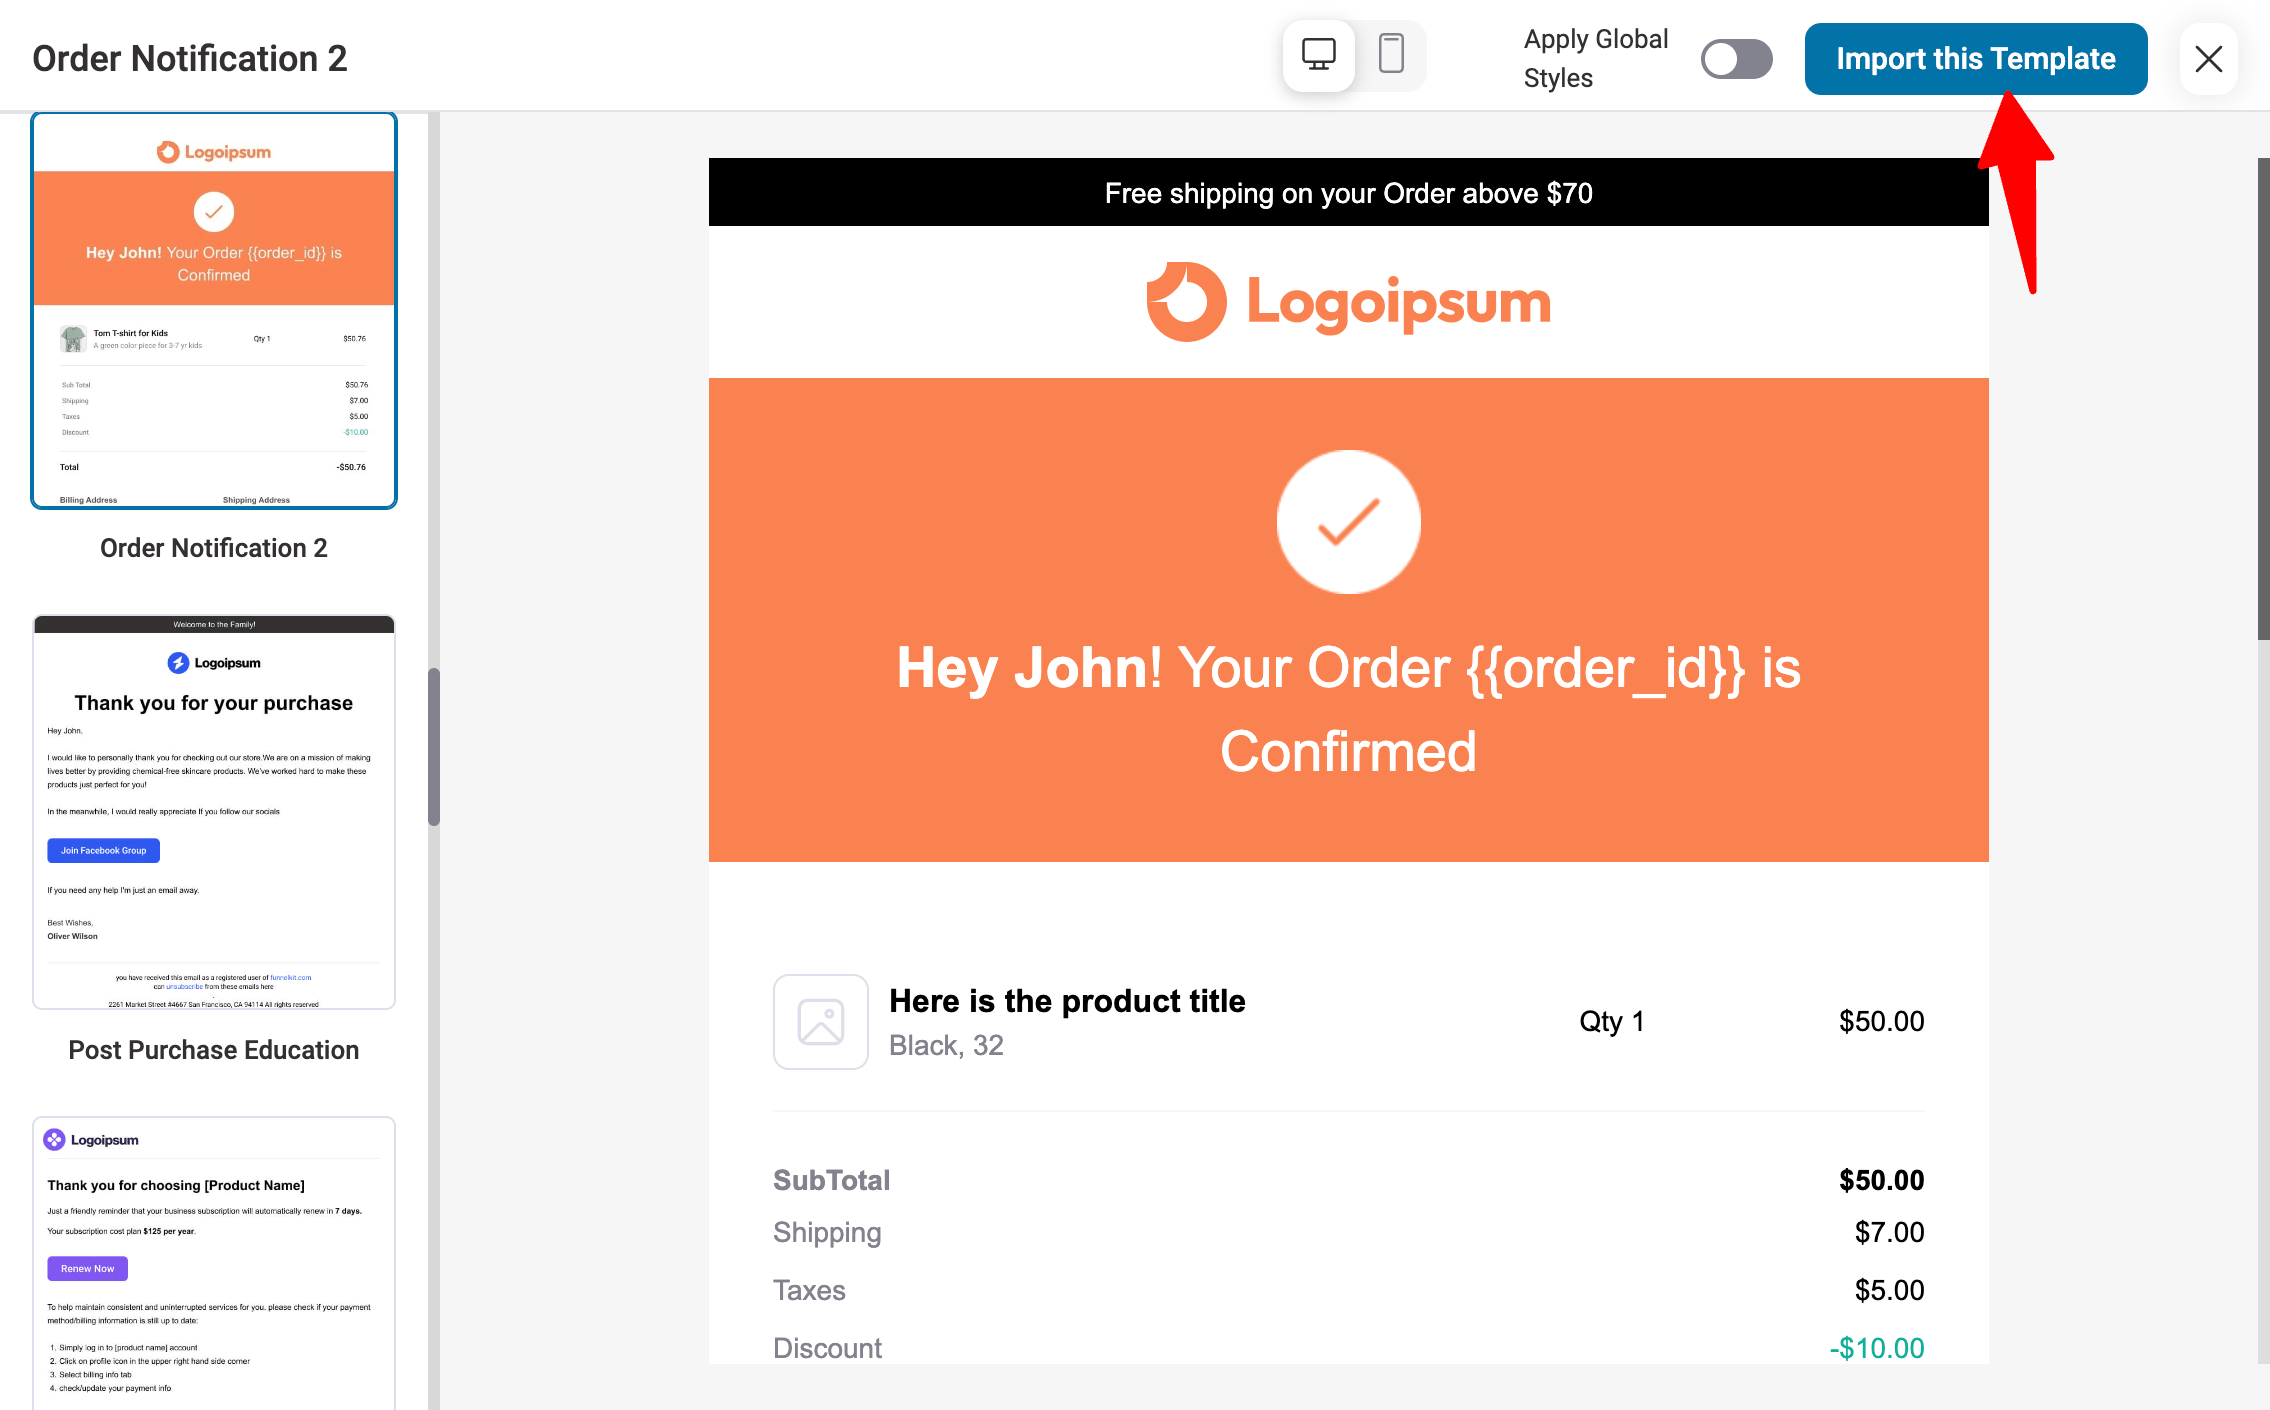
Use the Order Notification 2 template and customize it to create an email notifying the user that their order has been completed and offering a discount on their next purchase. Hover over the template and click "previews".
Click "Import this template"Importing it.
After importing, follow the steps below:
- Change top text: Replace the current text with new text to suit your branding needs.
- Updated brand logo: Upload and replace with your brand logo.
- Dynamic display of customer names: Replace the demo name "John" with the customer name merge tag to dynamically display the user's name.
Updated title text: Please change the title text to "Order Completed" to better represent the order completion status.

The pre-built templates contain order summary, billing and delivery information sections, so there is no need to add these. However, the appearance can be changed as needed.
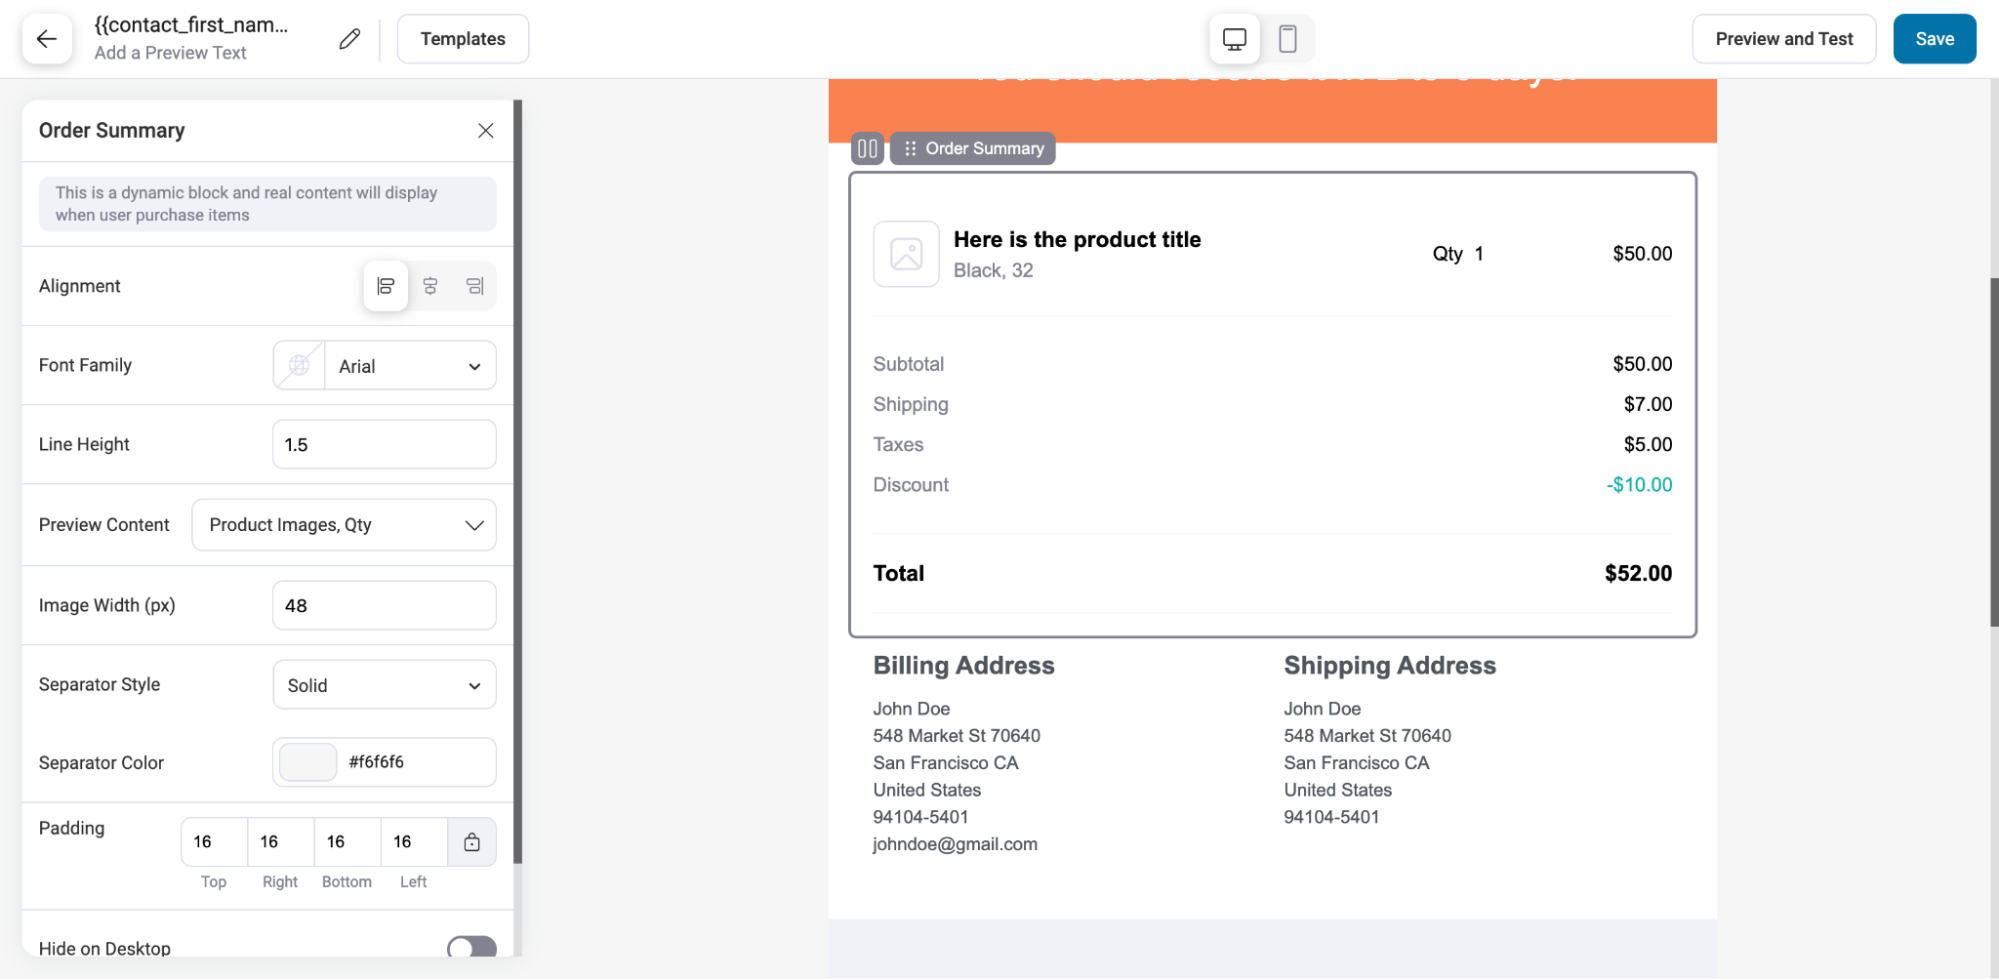
To encourage repeat purchases, we offer discount coupons in return. Please follow the steps below:
- Setting up the CTA link: Link the "Use Now" button to your store page.
- Shared Discount Coupons: Share discount coupons with your customers using FunnelKit Automations' WooCommerce Coupon Block.
- Add Discount Coupon Code: Add a discount coupon code on the left.
- Update coupon code text: Change the text to reflect the discount code you want to offer.
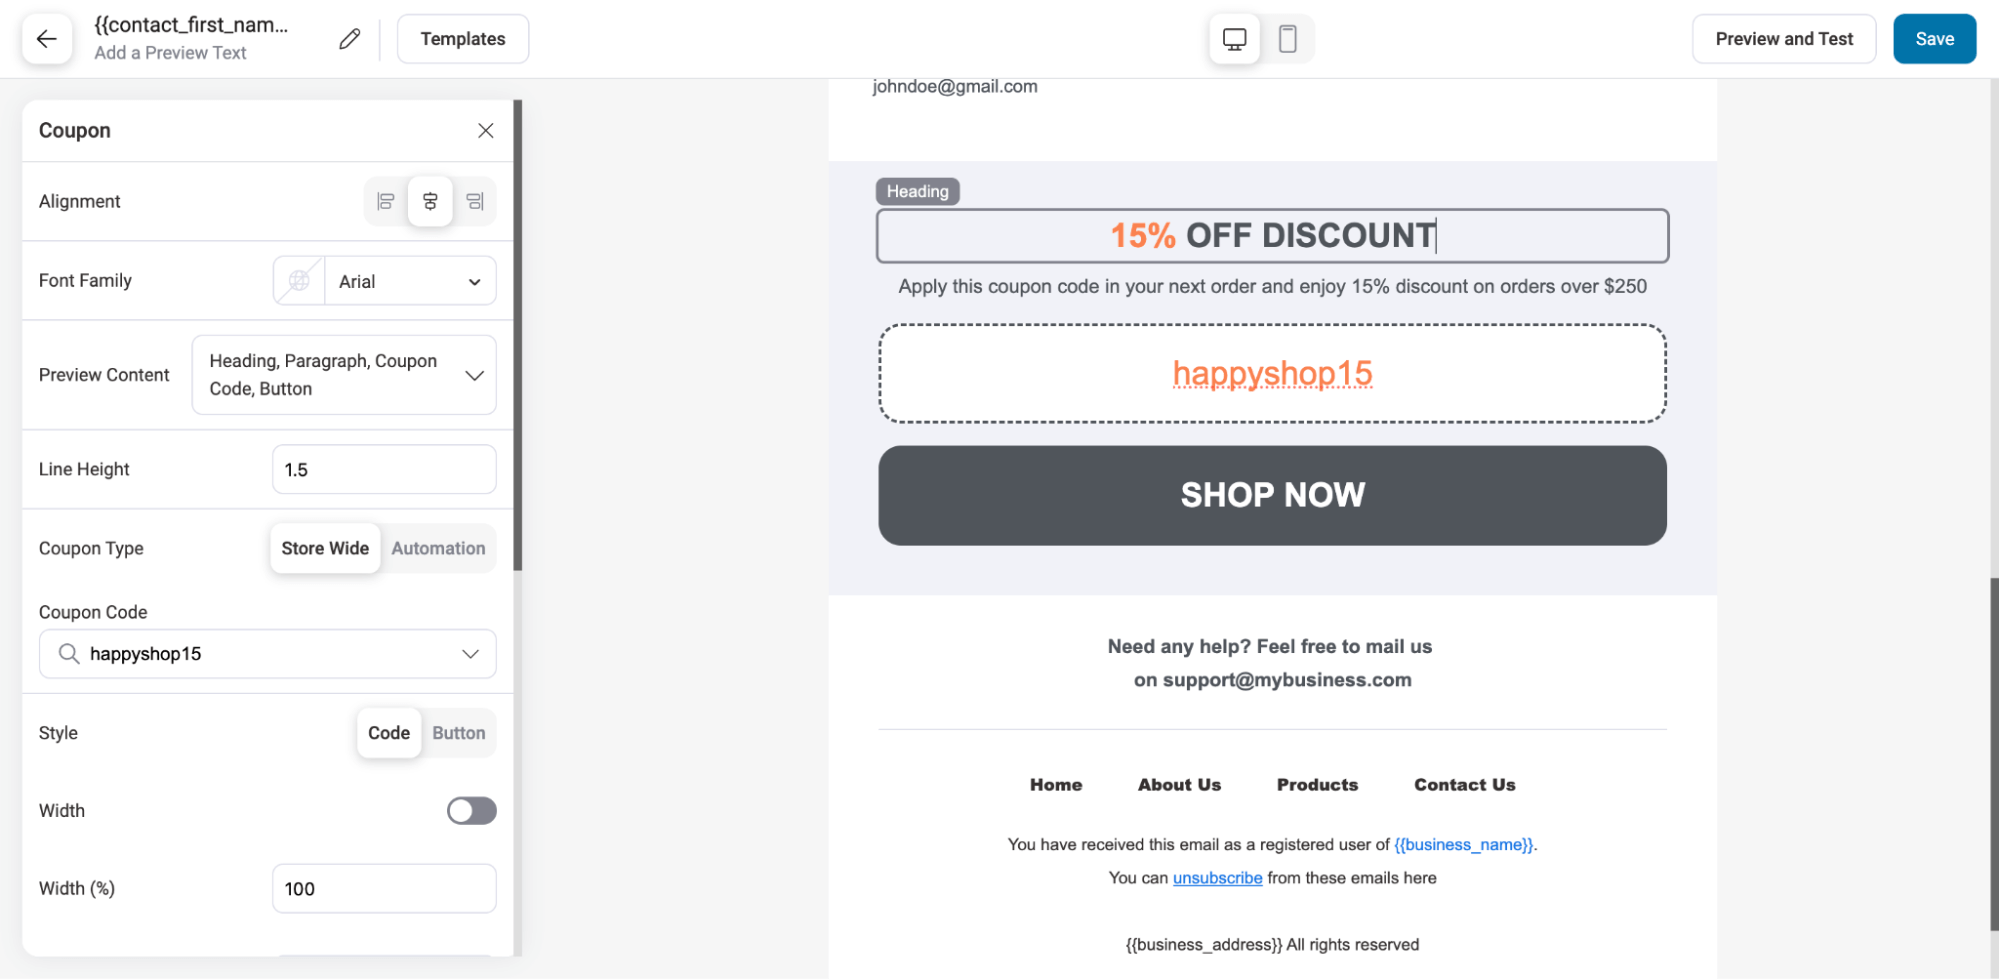
A section highlighting best-selling or related products can be added using the WooCommerce Product Block.

After making your changes, click "save (a file etc) (computing)"Making Updates.
🔔 Note:You can click on "Preview and Testing" to see previews and send test emails to see how the layout, design, and content will appear in your actual inbox.
The following is an example:

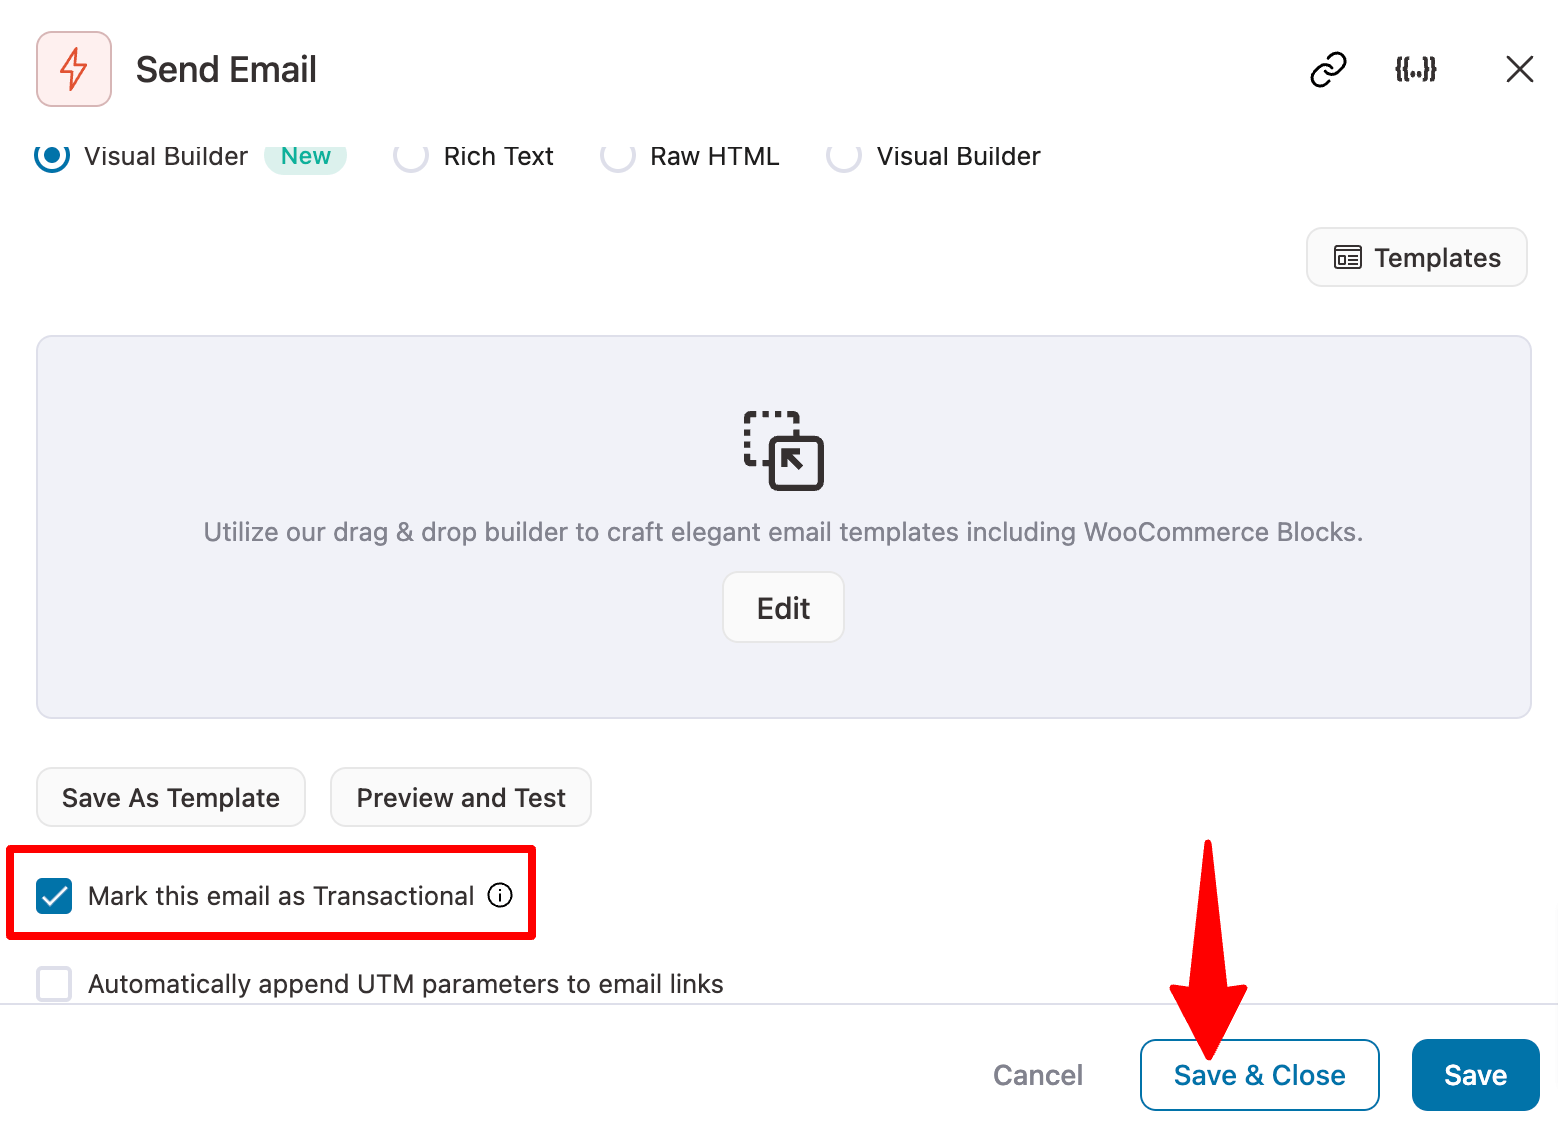
Attention:Be sure to mark this email as transactional, as the full status email for the order is transactional. Then click "Save and Close".
Step 7: Activate Email Automation
The final step is to activate the email automation you just created.
To activate automation, open the top right corner of theToggle Button.
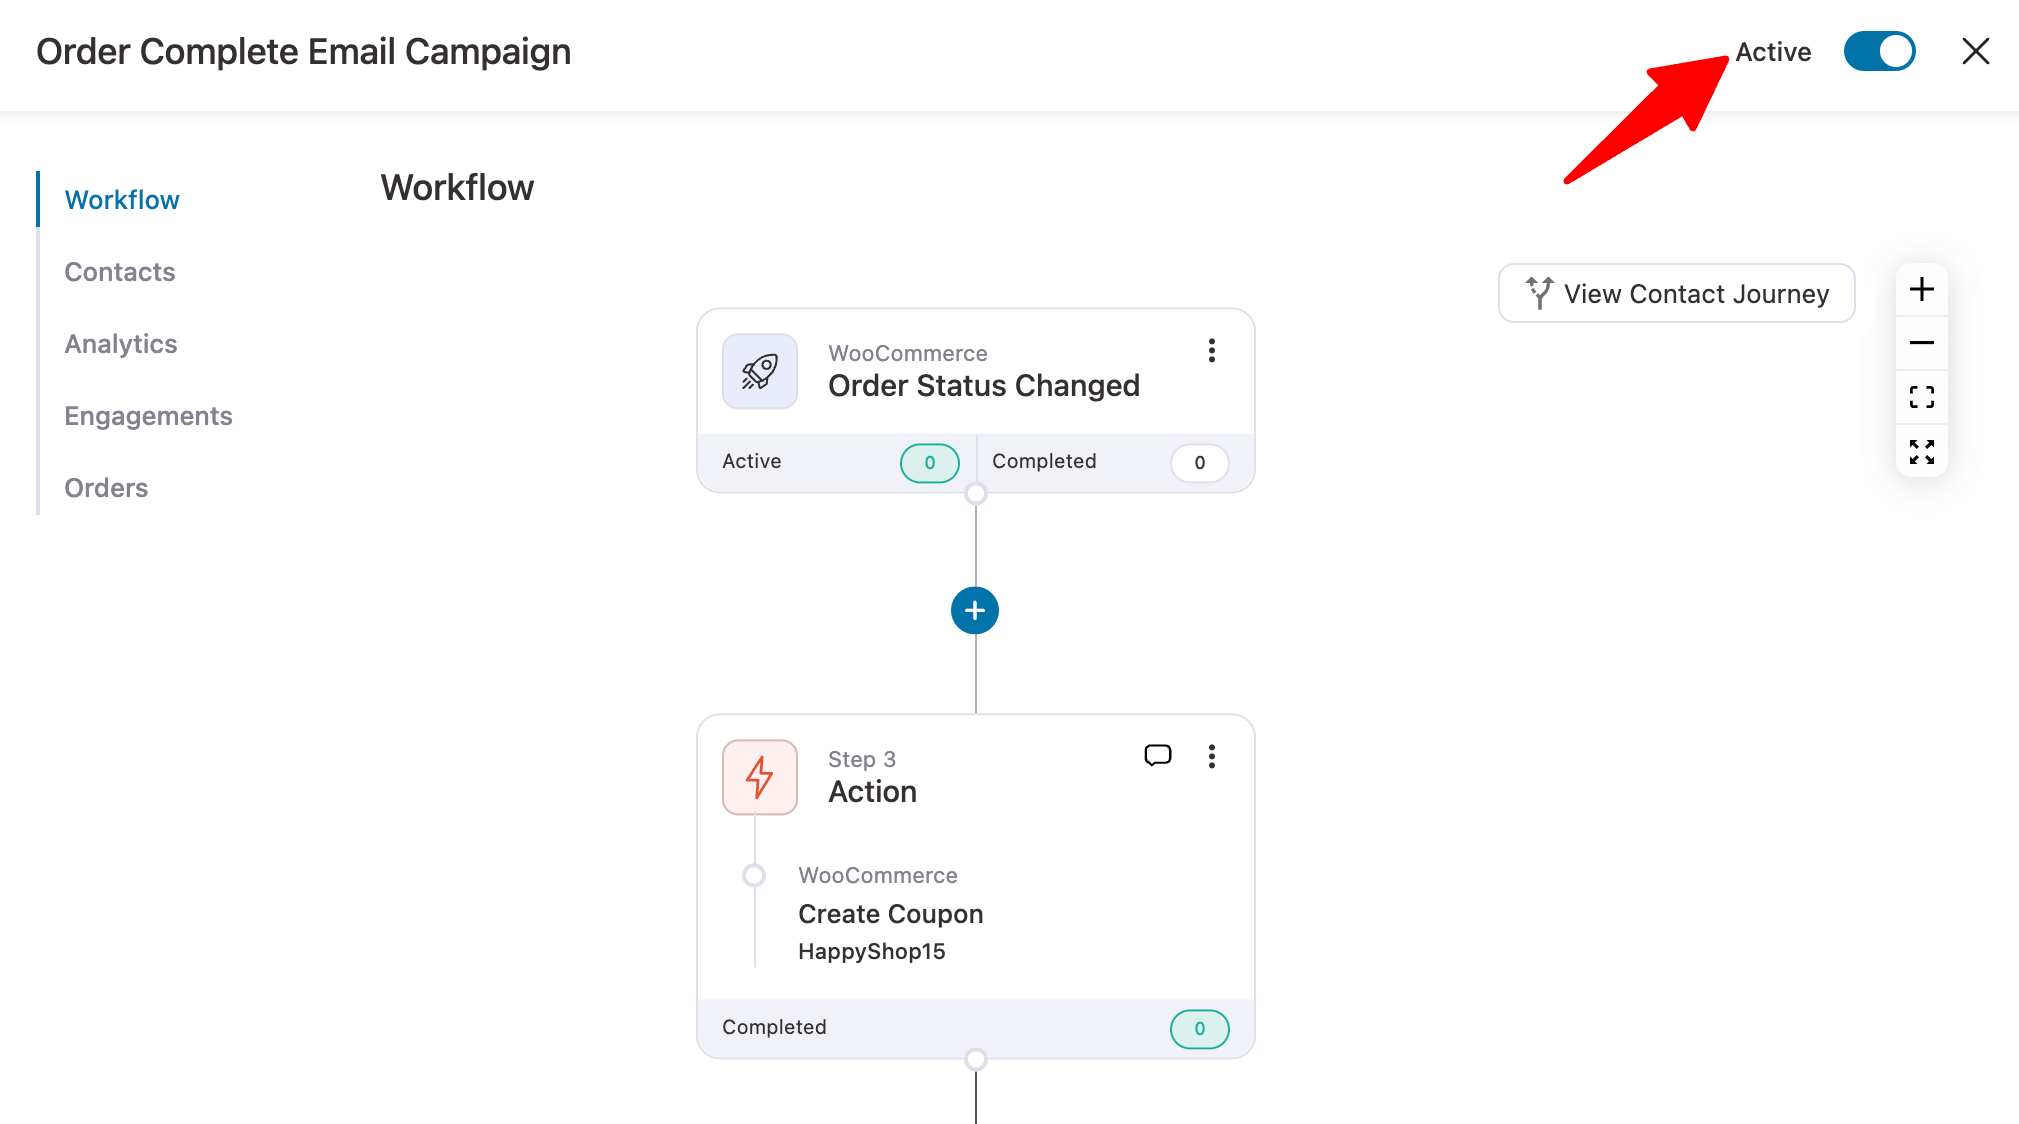
That's it! Your customized WooCommerce "Order Complete" status email is now live!
summarize
By setting up WooCommerce subscription reminder emails, you can effectively reduce administrative hassles, avoid refund requests and customer complaints, while increasing customer satisfaction and loyalty. With FunnelKit Automations, it's easy to disable default emails, create new automations, select triggers, generate dynamic coupons, and customize personalized order completion emails. This not only ensures that customers are alerted when their subscription is about to be renewed, but also encourages repeat purchases by offering discount coupons, thus increasing customer loyalty and satisfaction.
Link to this article:https://www.361sale.com/en/15560
The article is copyrighted and must be reproduced with attribution.










![Emoji[lenghan]-Photonflux.com | Professional WordPress Repair Service, Worldwide, Fast Response](https://www.361sale.com/wp-content/themes/zibll/img/smilies/lenghan.gif)


No comments