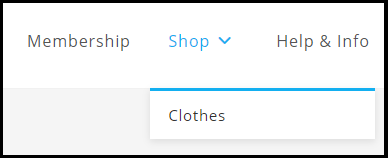
Creating menus is a WordPress feature. It is possible to use your theme to display menus. Let's take a look at it together!
![Image[1] - How to Create, Manage and Optimize Menus in WordPress: A Detailed How-to Guide - Photon Fluctuation Network | Professional WordPress Repair Service, Global Reach, Fast Response](https://www.361sale.com/wp-content/uploads/2024/07/2024072603350236.png)
Creating menus
In those order:
1. Log in to the WordPress dashboard.
2. Go toAppearance > Menu. DisplayMenu Page.
![Image [2] - How to Create, Manage and Optimize Menus in WordPress: A Detailed How-to Guide - Photon Fluctuation Network | Professional WordPress Repair Service, Global Reach, Fast Response](https://www.361sale.com/wp-content/uploads/2024/07/2024072602563067.png)
3. InputMenu NameThe
4. (Optional) If you want to automatically add the top-level page to the menu, check theAutomatically add pagesThe
5. (Optional) CheckShow position. This is where the menu is displayed on the website.
6. Click"Create menu"The
Delete menu
In those order:
1. Log in to the WordPress dashboard.
2. Go toAppearance > Menu. DisplayMenu Page.
![Image [3] - How to Create, Manage and Optimize Menus in WordPress: A Detailed How-to Guide - Photon Fluctuation Network | Professional WordPress Repair Service, Global Reach, Fast Response](https://www.361sale.com/wp-content/uploads/2024/07/2024072603002415.png)
3. ClickDelete menu. The system displays a confirmation message.
4. Click"OK."The
Creating multiple menus
In those order:
1. Log in to the WordPress dashboard.
2. Go toAppearance > Menu. DisplayMenu Page.
3. ClickCreate new menuThe
![Image [4] - How to Create, Manage and Optimize Menus in WordPress: A Detailed How-To Guide - Photon Fluctuation Network | Professional WordPress Repair Service, Global Reach, Fast Response](https://www.361sale.com/wp-content/uploads/2024/07/2024072603163282.png)
Adding pages to the menu
To create a menu before adding a page.
1. Log in to the WordPress dashboard.
2. Go toAppearance > Menu. DisplayMenu Page.
3. InAdd menu itemUnder the panel, expandweb pageThe
![Image [5] - How to Create, Manage and Optimize Menus in WordPress: A Detailed How-To Guide - Photon Fluctuation Network | Professional WordPress Repair Service, Global Reach, Fast Response](https://www.361sale.com/wp-content/uploads/2024/07/2024072603215518.png)
4. Select the page you want to insert and click the"Add to menu". The selected item will be displayed on the right.
![Image [6] - How to Create, Manage and Optimize Menus in WordPress: A Detailed How-To Guide - Photon Fluctuation Network | Professional WordPress Repair Service, Global Reach, Fast Response](https://www.361sale.com/wp-content/uploads/2024/07/2024072603221737.png)
5. Click"Save menu"The
The position of the menu items can be changed by dragging and dropping.
![Image [7] - How to Create, Manage and Optimize Menus in WordPress: A Detailed How-To Guide - Photon Fluctuation Network | Professional WordPress Repair Service, Global Reach, Fast Response](https://www.361sale.com/wp-content/uploads/2024/07/2024072603225365.png)
Delete page from menu
In those order:
- Log in to the WordPress Dashboard .
- switch toAppearance > Menu. DisplayMenu Page.
- click (using a mouse or other pointing device)"Batch selection". The menu item list will display checkboxes.
![Image [8] - How to Create, Manage and Optimize Menus in WordPress: A Detailed How-To Guide - Photon Fluctuation Network | Professional WordPress Repair Service, Global Reach, Fast Response](https://www.361sale.com/wp-content/uploads/2024/07/2024072603232735.png)
4. Check the menu items (pages) to be deleted. Displays a list of selected deleted items.
5. Click"Delete selected items"The
Creating submenus
In those order:
- Log in to the WordPress dashboard.
- switch toAppearance > Menu. DisplayMenu Page.
- Drag and drop an item so that it is placed slightly indented below the parent item.
![Image [9] - How to Create, Manage and Optimize Menus in WordPress: A Detailed How-to Guide - photonwave.com | Professional WordPress Repair Service, Global Reach, Fast Response](https://www.361sale.com/wp-content/uploads/2024/07/2024072603252369.png)
4. Click"Save menu"The
Adding customized links to the menu
External URLs, anchor links and placeholder links can be added using the custom linking options.
In those order:
- Log in to the WordPress dashboard.
- switch toAppearance > Menu. DisplayMenu Page.
- existAdd menu itemUnder the panel, expandCustomized linksThe
![Image [10] - How to Create, Manage and Optimize Menus in WordPress: A Detailed How-To Guide - Photon Fluctuation Network | Professional WordPress Repair Service, Global Reach, Fast Response](https://www.361sale.com/wp-content/uploads/2024/07/2024072603260793.png)
4. Enter the following:
URL - The link that opens when clicked.
link text- The text that should appear on the menu.
5. Click"Add to menu"The
6. Click"Save menu"The
Adding blog categories to the menu
You can specify a blog archive category from Categories.
- Log in to WP Admin.
- switch toAppearance > Menu. DisplayMenu Page.
- existAdd menu itemUnder the panel, expandformThe
![Image [11] - How to Create, Manage and Optimize Menus in WordPress: A Detailed How-to Guide - photonwave.com | Professional WordPress Repair Service, Worldwide, Fast Response](https://www.361sale.com/wp-content/uploads/2024/07/2024072603282214.png)
4. Select the desired category.
![Image [12] - How to Create, Manage and Optimize Menus in WordPress: A Detailed How-to Guide - Photon Fluctuation | Professional WordPress Repair Service, Worldwide, Fast Response](https://www.361sale.com/wp-content/uploads/2024/07/2024072603284151.png)
5. Click"Add to menu"The
6. Click"Save changes"The
Manage menu locations
The theme can support multiple menu locations. This means that multiple menus can be created and assigned to different locations on the site.
In those order:
- Log in to the WordPress dashboard.
- go intoAppearance > Menu. DisplayMenu Page.
- click (using a mouse or other pointing device)"Management position"The

- Assign the menu to theTopic LocationThe different locations that appear under the

The number of positions can vary depending on the theme used.
5. Click"Save changes"The
View Menu
In those order:
- Log in to the WordPress dashboard.
- Hover over the site name.

- click (using a mouse or other pointing device)"Visit the website"The
Your site shows the available menus.

Link to this article:https://www.361sale.com/en/14709
The article is copyrighted and must be reproduced with attribution.


No comments